- JPA Entity Relationship
- One-to-One Relationship
- One-to-Many Relationship
- JPQL
- Hibernate Validator
- Spring Modules
- Spring Batch
What is JPA Entity Relationship?
Multiplicities are of the following types.
- One-to-One
- Each entity instance is related to a single instance of another entity.
- For example, to model a physical warehouse in which each storage bin contains a single widget, StorageBin and Widget would have a one-to-one relationship.
- One-to-one relationships use the javax.persistence.OneToOne annotation on the corresponding persistent property or field.
- One-to-Many
- An entity instance can be related to multiple instances of the other entities.
- A sales order, for example, can have multiple line items. In the order application, CustomerOrder would have a one-to-many relationship with LineItem.
- One-to-many relationships use the javax.persistence.OneToMany annotation on the corresponding persistent property or field.
- Many-to-One
- Multiple instances of an entity can be related to a single instance of the other entity. This multiplicity is the opposite of a one-to-many relationship.
- In the example just mentioned, the relationship to CustomerOrder from the perspective of LineItem is many-to-one.
- Many-to-one relationships use the javax.persistence.ManyToOne annotation on the corresponding persistent property or field.
- Many-to-Many
- The entity instances can be related to multiple instances of each other.
- For example, each college course has many students, and every student may take several courses. Therefore, in an enrollment application, Course and Student would have a many-to-many relationship.
- Many-to-many relationships use the javax.persistence.ManyToMany annotation on the corresponding persistent property or field.
Create JPA Entity with One-to-One Relationship
Reference: https://www.javaguides.net/2019/08/spring-boot-jpa-hibernate-one-to-one-mapping-example.html
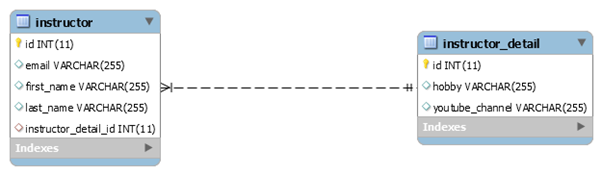
In this example, we create Instructor and InstructorDetail entities and we make a one-to-one mapping between them.
Create a new project (optional)
- Use Spring Initializr or STS to create a new project with below settings.
- Project: Maven
- Language: Java
- Spring Boot: current version
- Group: com.example
- Artifact: one-to-one-demo
- Name: one-to-one-demo
- Description: Demo project for One-to-One
- Package name: com.example.one-to-one-demo
- Packaging: Jar
- Java: 17 or 21
- Dependencies: Spring Web, Spring Data JPA, PostgreSQL Driver
- Click Generate. Extract the downloaded zip file then import it into Eclipse.
Configure PostgreSQL database connection in application.properties
spring.datasource.url=jdbc:postgresql://localhost:5432/testdb
spring.datasource.username=postgres
spring.datasource.password=Pa$$w0rd
spring.jpa.properties.hibernate.jdbc.lob.non_contextual_creation=true
spring.jpa.properties.hibernate.dialect=org.hibernate.dialect.PostgreSQLDialect

# Hibernate ddl auto (create, create-drop, validate, update)
spring.jpa.hibernate.ddl-auto=update

#show sql statements
spring.jpa.show-sql=true
spring.jpa.properties.hibernate.format_sql=true

#show sql values
logging.level.org.hibernate.type.descriptor.sql=trace
logging.level.org.hibernate.type.descriptor.sql.BasicBinder=TRACE
logging.level.org.hibernate.SQL=DEBUG
Create Instructor entity class
import jakarta.persistence.CascadeType;
import jakarta.persistence.Column;
import jakarta.persistence.Entity;
import jakarta.persistence.GeneratedValue;
import jakarta.persistence.GenerationType;
import jakarta.persistence.Id;
import jakarta.persistence.JoinColumn;
import jakarta.persistence.OneToOne;
import jakarta.persistence.Table;

@Entity
@Table(name = "instructor")
public class Instructor {

	@Id
	@GeneratedValue(strategy = GenerationType.IDENTITY)
	@Column(name = "id")
	private Long id;

	@Column(name = "first_name")
	private String firstName;

	@Column(name = "last_name")
	private String lastName;

	@Column(name = "email")
	private String email;

	@OneToOne(cascade = CascadeType.ALL)
	@JoinColumn(name = "instructor_detail_id")
	private InstructorDetail instructorDetail;

	public Instructor() {

	}

	public Instructor(String firstName, String lastName, String email) {
		this.firstName = firstName;
		this.lastName = lastName;
		this.email = email;
	}

	public Long getId() {
		return id;
	}

	public void setId(Long id) {
		this.id = id;
	}

	public String getFirstName() {
		return firstName;
	}

	public void setFirstName(String firstName) {
		this.firstName = firstName;
	}

	public String getLastName() {
		return lastName;
	}

	public void setLastName(String lastName) {
		this.lastName = lastName;
	}

	public String getEmail() {
		return email;
	}

	public void setEmail(String email) {
		this.email = email;
	}

	public InstructorDetail getInstructorDetail() {
		return instructorDetail;
	}

	public void setInstructorDetail(InstructorDetail instructorDetail) {
		this.instructorDetail = instructorDetail;
	}
}
Create InstructorDetail entity class
import jakarta.persistence.Column;
import jakarta.persistence.Entity;
import jakarta.persistence.GeneratedValue;
import jakarta.persistence.GenerationType;
import jakarta.persistence.Id;
import jakarta.persistence.Table;

@Entity
@Table(name = "instructor_detail")
public class InstructorDetail {

	@Id
	@GeneratedValue(strategy = GenerationType.IDENTITY)
	@Column(name = "id")
	private Long id;

	@Column(name = "youtube_channel")
	private String youtubeChannel;

	@Column(name = "hobby")
	private String hobby;

	public InstructorDetail() {

	}

	public InstructorDetail(String youtubeChannel, String hobby) {
		this.youtubeChannel = youtubeChannel;
		this.hobby = hobby;
	}

	public Long getId() {
		return id;
	}

	public void setId(Long id) {
		this.id = id;
	}

	public String getYoutubeChannel() {
		return youtubeChannel;
	}

	public void setYoutubeChannel(String youtubeChannel) {
		this.youtubeChannel = youtubeChannel;
	}

	public String getHobby() {
		return hobby;
	}

	public void setHobby(String hobby) {
		this.hobby = hobby;
	}
}
@OneToOne Annotation
In Spring Data JPA, a one-to-one relationship between two entities is declared by using the @OneToOne annotation. It accepts the following parameters:
- fetch – Defines a strategy for fetching data from the database. By default, it is EAGER which means that the data must be eagerly fetched. We have set it to LAZY to fetch the entities lazily from the database.
- cascade – Defines a set of cascadable operations that are applied to the associated entity. CascadeType.ALL means to apply all cascading operations to the related entity. Cascading operations are applied when you delete or update the parent entity.
- mappedBy – Defines the entity that owns the relationship which is the Address entity in our case.
- optional – Defines whether the relationship is optional. If set to false then a non-null relationship must always exist.
@JoinColumn Annotation
The @JoinColumn annotation is used to specify the foreign key column in the owner of the relationship. The inverse-side of the relationship sets the @OneToOne’s mappedBy parameter to indicate that the relationship is mapped by the other entity.
The @JoinColumn accepts the following two important parameters, among others:
- name – Defines the name of the foreign key column.
- nullable – Defines whether the foreign key column is nullable. By default, it is true.
Create InstructorRepository interface
import org.springframework.data.jpa.repository.JpaRepository;

public interface InstructorRepository extends JpaRepository<Instructor, Long> {

}
Create InstructorController
import java.util.HashMap;
import java.util.List;
import java.util.Map;
import java.util.Optional;
import org.springframework.beans.factory.annotation.Autowired;
import org.springframework.http.HttpStatus;
import org.springframework.http.ResponseEntity;
import org.springframework.web.bind.annotation.DeleteMapping;
import org.springframework.web.bind.annotation.GetMapping;
import org.springframework.web.bind.annotation.PathVariable;
import org.springframework.web.bind.annotation.PostMapping;
import org.springframework.web.bind.annotation.PutMapping;
import org.springframework.web.bind.annotation.RequestBody;
import org.springframework.web.bind.annotation.RestController;
@RestController
public class InstructorController {
@Autowired
private InstructorRepository instructorRepository;
@GetMapping("/instructors")
public List<Instructor> getInstructors() {
return instructorRepository.findAll();
}
@GetMapping("/instructors/{id}")
public ResponseEntity<Optional<Instructor>> getInstructorById(@PathVariable(value = "id") Long instructorId)
throws Exception {
Optional<Instructor> user = instructorRepository.findById(instructorId);
return ResponseEntity.ok().body(user);
}
@PostMapping("/instructors")
public Instructor createUser(@RequestBody Instructor instructor) {
return instructorRepository.save(instructor);
}
@PutMapping("/instructors/{id}")
public ResponseEntity<Instructor> updateUser(@PathVariable(value = "id") Long instructorId,
@RequestBody InstructorDetail userDetails) throws Exception {
Optional<Instructor> instructor = instructorRepository.findById(instructorId);
if (instructor.isPresent()) {
InstructorDetail _details = new InstructorDetail();
_details.setYoutubeChannel(userDetails.getYoutubeChannel());
_details.setHobby(userDetails.getHobby());
Instructor _instructor = instructor.get();
_instructor.setInstructorDetail(_details);
final Instructor updatedUser = instructorRepository.save(_instructor);
return new ResponseEntity<>(updatedUser, HttpStatus.OK);
} else {
return new ResponseEntity<>(HttpStatus.NOT_FOUND);
}
}
@DeleteMapping("/instructors/{id}")
public ResponseEntity<String> deleteUser(@PathVariable(value = "id") Long instructorId) throws Exception {
Optional<Instructor> instructor = instructorRepository.findById(instructorId);
if (instructor.isPresent()) {
Instructor _instructor = instructor.get();
instructorRepository.delete(_instructor);
Map<String, Boolean> response = new HashMap<>();
response.put("deleted", Boolean.TRUE);
return new ResponseEntity<>(response.toString(), HttpStatus.OK);
} else {
return new ResponseEntity<>(HttpStatus.NOT_FOUND);
}
}
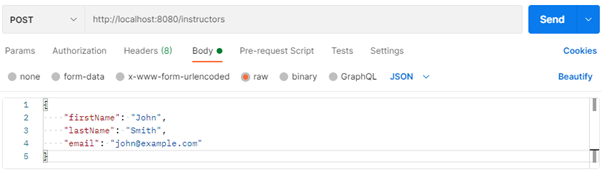
}Run the application and test it using Postman

This will return nothing as the table is initially empty. Next step, insert a new User record.
Add new record with POST request.
Verify that the new record is successfully added to table.
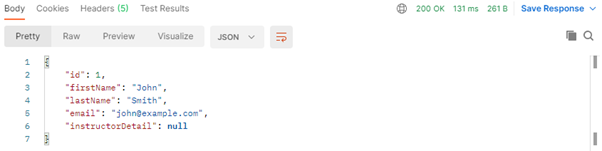
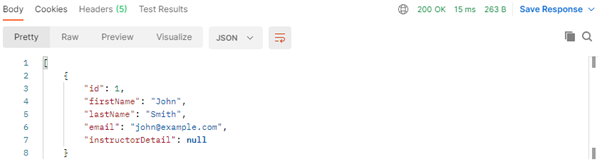
Run the GET request again and verify that there is one record returned. Take note that at this point the instructorDetail is null. We are going to update this in the next step.
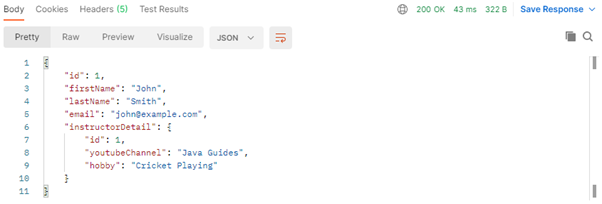
Update the record using PUT request.
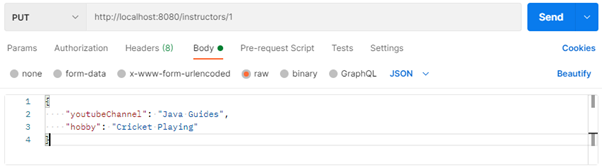
Verify that the record has been successfully updated.
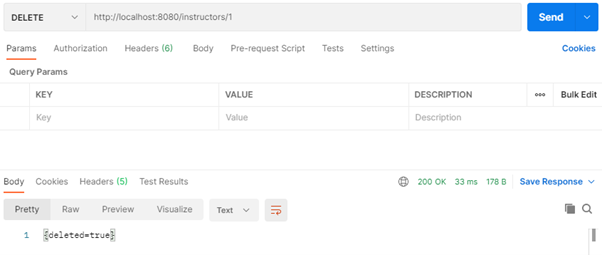
Delete the record by sending DELETE request.
Create JPA Entity with One-to-Many Relationship
Reference: https://www.callicoder.com/hibernate-spring-boot-jpa-one-to-many-mapping-example/
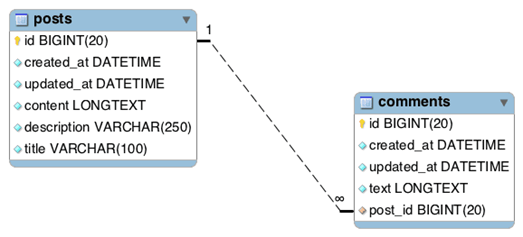
Consider the following two tables – posts and comments of a Blog database schema where the posts table has a one-to-many relationship with the comments table.
Create a new project (optional)
- Use Spring Initializr or STS to create a new project with below settings.
- Project: Maven
- Language: Java
- Spring Boot: current version
- Group: com.example
- Artifact: one-to-many-demo
- Name: one-to-many-demo
- Description: Demo project for One-to-Many
- Package name: com.example.one-to-many-demo
- Packaging: Jar
- Java: 17 or 21
- Dependencies: Spring Web, Spring Data JPA, PostgreSQL Driver
- Click Generate. Extract the downloaded zip file then import it into Eclipse.
Configure PostgreSQL database connection in application.properties
spring.datasource.url=jdbc:postgresql://localhost:5432/testdb
spring.datasource.username=postgres
spring.datasource.password=Pa$$w0rd
spring.jpa.properties.hibernate.jdbc.lob.non_contextual_creation=true
spring.jpa.properties.hibernate.dialect=org.hibernate.dialect.PostgreSQLDialect

# Hibernate ddl auto (create, create-drop, validate, update)
spring.jpa.hibernate.ddl-auto=update

#show sql statements
spring.jpa.show-sql=true
spring.jpa.properties.hibernate.format_sql=true

#show sql values
logging.level.org.hibernate.type.descriptor.sql=trace
logging.level.org.hibernate.type.descriptor.sql.BasicBinder=TRACE
logging.level.org.hibernate.SQL=DEBUG
Defining the Domain Models
In this section, we will define the domain models of our application – Post and Comment.
Post Model
import jakarta.persistence.*;
import jakarta.validation.constraints.NotNull;
import jakarta.validation.constraints.Size;

@Entity
@Table(name = "posts")
public class Post {

	@Id
	@GeneratedValue(strategy = GenerationType.IDENTITY)
	private Long id;

	@NotNull
	@Size(max = 100)
	@Column(unique = true)
	private String title;

	@NotNull
	@Size(max = 250)
	private String description;

	@NotNull
	private String content;

	public Post() {
	}

	public Long getId() {
		return id;
	}

	public void setId(Long id) {
		this.id = id;
	}

	public String getTitle() {
		return title;
	}

	public void setTitle(String title) {
		this.title = title;
	}

	public String getDescription() {
		return description;
	}

	public void setDescription(String description) {
		this.description = description;
	}

	public String getContent() {
		return content;
	}

	public void setContent(String content) {
		this.content = content;
	}

}
Comment Model
import com.fasterxml.jackson.annotation.JsonIgnore;
import jakarta.persistence.*;
import jakarta.validation.constraints.NotNull;
import org.hibernate.annotations.OnDelete;
import org.hibernate.annotations.OnDeleteAction;

@Entity
@Table(name = "comments")
public class Comment {

	@Id
	@GeneratedValue(strategy = GenerationType.IDENTITY)
	private Long id;

	@NotNull
	private String text;

	@ManyToOne(fetch = FetchType.LAZY, optional = false)
	@JoinColumn(name = "post_id", nullable = false)
	@OnDelete(action = OnDeleteAction.CASCADE)
	@JsonIgnore
	private Post post;

	public Comment() {
	}

	public Long getId() {
		return id;
	}

	public void setId(Long id) {
		this.id = id;
	}

	public String getText() {
		return text;
	}

	public void setText(String text) {
		this.text = text;
	}

	public Post getPost() {
		return post;
	}

	public void setPost(Post post) {
		this.post = post;
	}

}
Defining Repositories
Next, we will define the repositories for accessing the data from the database.
PostRepository
import org.springframework.data.jpa.repository.JpaRepository;

public interface PostRepository extends JpaRepository<Post, Long> {

}
CommentRepository
import java.util.Optional;

import org.springframework.data.domain.Page;
import org.springframework.data.domain.Pageable;
import org.springframework.data.jpa.repository.JpaRepository;

public interface CommentRepository extends JpaRepository<Comment, Long> {

	Page<Comment> findByPostId(Long postId, Pageable pageable);

	Optional<Comment> findByIdAndPostId(Long id, Long postId);
}
Writing the REST APIs to perform CRUD operations on the entities
Let us now write the REST APIs to perform CRUD operations on Post and Comment entities.
PostController (APIs to create, retrieve, update, and delete Posts)
import org.springframework.beans.factory.annotation.Autowired;
import org.springframework.data.domain.Page;
import org.springframework.data.domain.Pageable;
import org.springframework.http.ResponseEntity;
import org.springframework.web.bind.annotation.*;

import jakarta.validation.Valid;

@RestController
public class PostController {

	@Autowired
	private PostRepository postRepository;

	@GetMapping("/posts")
	public Page<Post> getAllPosts(Pageable pageable) {
		return postRepository.findAll(pageable);
	}

	@PostMapping("/posts")
	public Post createPost(@Valid @RequestBody Post post) {
		return postRepository.save(post);
	}

	@PutMapping("/posts/{postId}")
	public Post updatePost(@PathVariable Long postId, @Valid @RequestBody Post postRequest) {
		return postRepository.findById(postId).map(post -> {
			post.setTitle(postRequest.getTitle());
			post.setDescription(postRequest.getDescription());
			post.setContent(postRequest.getContent());
			return postRepository.save(post);
		}).orElseThrow(() -> new ResourceNotFoundException("PostId " + postId + " not found"));
	}

	@DeleteMapping("/posts/{postId}")
	public ResponseEntity<?> deletePost(@PathVariable Long postId) {
		return postRepository.findById(postId).map(post -> {
			postRepository.delete(post);
			return ResponseEntity.ok().build();
		}).orElseThrow(() -> new ResourceNotFoundException("PostId " + postId + " not found"));
	}
}
CommentController (APIs to create, retrieve, update, and delete Comments)
import org.springframework.beans.factory.annotation.Autowired;
import org.springframework.data.domain.Page;
import org.springframework.data.domain.Pageable;
import org.springframework.http.ResponseEntity;
import org.springframework.web.bind.annotation.*;

import jakarta.validation.Valid;

@RestController
public class CommentController {

	@Autowired
	private CommentRepository commentRepository;

	@Autowired
	private PostRepository postRepository;

	@GetMapping("/posts/{postId}/comments")
	public Page<Comment> getAllCommentsByPostId(@PathVariable(value = "postId") Long postId, Pageable pageable) {
		return commentRepository.findByPostId(postId, pageable);
	}

	@PostMapping("/posts/{postId}/comments")
	public Comment createComment(@PathVariable(value = "postId") Long postId, @Valid @RequestBody Comment comment) {
		return postRepository.findById(postId).map(post -> {
			comment.setPost(post);
			return commentRepository.save(comment);
		}).orElseThrow(() -> new ResourceNotFoundException("PostId " + postId + " not found"));
	}

	@PutMapping("/posts/{postId}/comments/{commentId}")
	public Comment updateComment(@PathVariable(value = "postId") Long postId,
			@PathVariable(value = "commentId") Long commentId, @Valid @RequestBody Comment commentRequest) {
		if (!postRepository.existsById(postId)) {
			throw new ResourceNotFoundException("PostId " + postId + " not found");
		}

		return commentRepository.findById(commentId).map(comment -> {
			comment.setText(commentRequest.getText());
			return commentRepository.save(comment);
		}).orElseThrow(() -> new ResourceNotFoundException("CommentId " + commentId + "not found"));
	}

	@DeleteMapping("/posts/{postId}/comments/{commentId}")
	public ResponseEntity<?> deleteComment(@PathVariable(value = "postId") Long postId,
			@PathVariable(value = "commentId") Long commentId) {
		return commentRepository.findByIdAndPostId(commentId, postId).map(comment -> {
			commentRepository.delete(comment);
			return ResponseEntity.ok().build();
		}).orElseThrow(() -> new ResourceNotFoundException(
				"Comment not found with id " + commentId + " and postId " + postId));
	}
}
The ResourceNotFoundException Class
Both the Post and Comment Rest APIs throw ResourceNotFoundException when a post or comment could not be found. Following is the definition of the ResourceNotFoundException.
import org.springframework.http.HttpStatus;
import org.springframework.web.bind.annotation.ResponseStatus;

@ResponseStatus(HttpStatus.NOT_FOUND)
public class ResourceNotFoundException extends RuntimeException {

	private static final long serialVersionUID = 1L;

	public ResourceNotFoundException() {
		super();
	}

	public ResourceNotFoundException(String message) {
		super(message);
	}

	public ResourceNotFoundException(String message, Throwable cause) {
		super(message, cause);
	}
}
Run the application and test it using Postman
Send a GET request to http://localhost:8080/posts

Verify that there is no record found.
Create a Post by sending a POST request to http://localhost:8080/posts
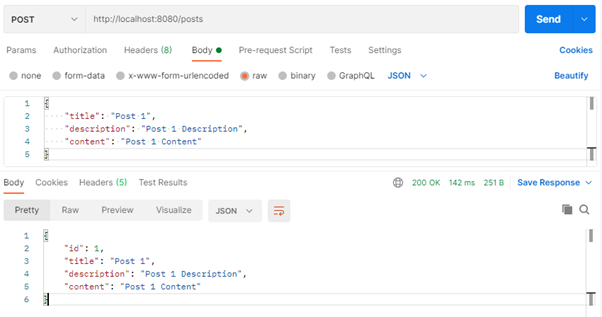
Send another GET request to http://localhost:8080/posts
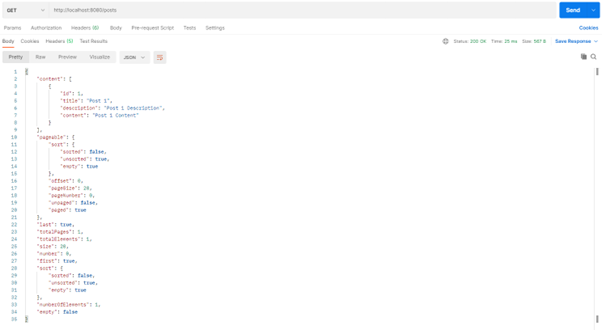
Verify that there is 1 record found.
Create a Comment for a Post.
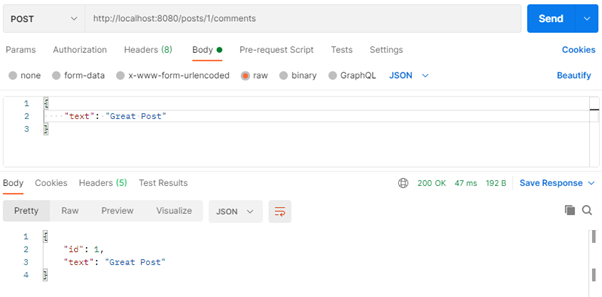
Create another Comment for the same Post.

Verify that the comments are successfully added for the same Post.
What is JPQL?
The JPQL (Java Persistence Query Language) is an object-oriented query language which is used to perform database operations on persistent entities. Instead of database table, JPQL uses entity object model to operate the SQL queries. Here, the role of JPA is to transform JPQL into SQL. Thus, it provides an easy platform for developers to handle SQL tasks.
JPQL is an extension of Entity JavaBeans Query Language (EJBQL), adding the following important features to it:
- It can perform join operations.
- It can update and delete data in a bulk.
- It can perform aggregate function with sorting and grouping clauses.
- Single and multiple value result types.
JPQL Features
- It is a platform-independent query language.
- It is simple and robust.
- It can be used with any type of database such as MySQL, Oracle.
- JPQL queries can be declared statically into metadata or can also be dynamically built-in code.
What is JPA Projection?
The projection describes which columns you select from your database and in which form Hibernate provides them to you. Or in other words, if you are writing a JPQL query, it is everything between the SELECT and the FROM keywords.
em.createQuery("SELECT b.title, b.publisher, b.author.name FROM Book b");SQL only supports scalar projections, like table columns or the return value of a database function. So, how can JPA and Hibernate support more projections?
Hibernate first checks which information it needs to retrieve from the database and generates an SQL statement with a scalar value projection for it. It then executes the query and returns the result if you used a scalar value projection in your code. If you requested a DTO or entity projection, Hibernate applies an additional transformation step. It iterates through the result set and instantiates an entity or a DTO object for each record.
Class Discussion
Add a new function to retrieve a post with it’s corresponding comments. This function will take a query defined using JPQL.
Add codes below to PostRepository created earlier.
import java.util.List;

import org.springframework.data.jpa.repository.JpaRepository;
import org.springframework.data.jpa.repository.Query;

public interface PostRepository extends JpaRepository<Post, Long> {

	@Query("select p.title, p.description, p.content, c.id, c.text from Post p, Comment c "
			+ "where p.id=:postId")
	List<String> findPostWithComments(Long postId);
}
To test this function, add below codes to PostController.
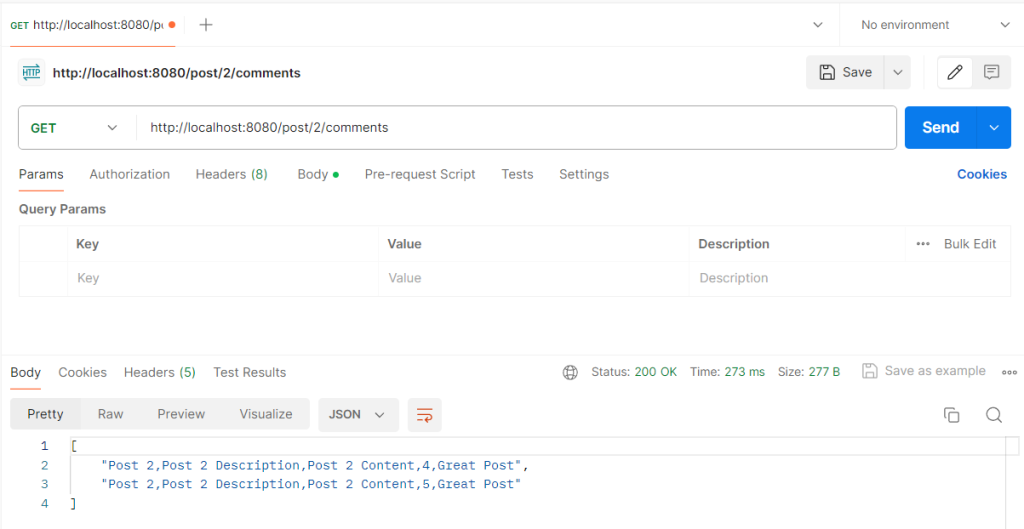
	@GetMapping("/post/{id}/comments")
	public ResponseEntity<List<String>> getPostById(@PathVariable(value = "id") Long postId) throws Exception {
		List<String> posts = new ArrayList<>();
		posts = postRepository.findPostWithComments(postId);
		return ResponseEntity.ok().body(posts);
	}
Run the application and test the service using this URL http://localhost:8080/post/2/comments and verify the output looks like below.
What is Hibernate Validator?
Reference: https://hibernate.org/validator/
Hibernate Validator allows to express and validate application constraints. The default metadata source are annotations, with the ability to override and extend through the use of XML. It is not tied to a specific application tier or programming model and is available for both server and client application programming.

Using Validation Annotations
Constraints in Bean Validation are expressed via Java annotations. There are three types of bean constraints:
- field constraints
- property constraints
- class constraints
Field-level Constraint Validator
Constraints can be expressed by annotating a field of a class.
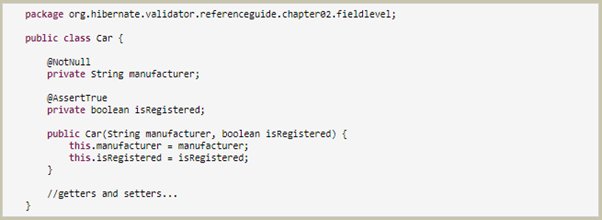
When using field-level constraints field access strategy is used to access the value to be validated. This means the validation engine directly accesses the instance variable and does not invoke the property accessor method even if such an accessor exists.
Constraints can be applied to fields of any access type (public, private etc.). Constraints on static fields are not supported, though.
Property-level Constraint Validator
When using field-level constraints field access strategy is used to access the value to be validated. This means the validation engine directly accesses the instance variable and does not invoke the property accessor method even if such an accessor exists.
Constraints can be applied to fields of any access type (public, private etc.). Constraints on static fields are not supported, though.

When using property level constraints property access strategy is used to access the value to be validated, i.e., the validation engine accesses the state via the property accessor method.
Class-level Constraint Validator
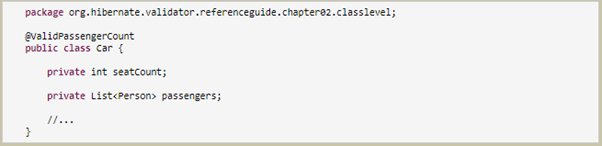
Finally, a constraint can also be placed on the class level. In this case not a single property is subject of the validation but the complete object. Class-level constraints are useful if the validation depends on a correlation between several properties of an object.
The Car class in the example below has the two attributes seatCount and passengers and it should be ensured that the list of passengers has not more entries than seats are available. For that purpose, the @ValidPassengerCount constraint is added on the class level. The validator of that constraint has access to the complete Car object, allowing to compare the numbers of seats and passengers.
Class Discussion
To test the validations on Post and Comment, add below dependency to pom.xml
<dependency>
		<groupId>org.springframework.boot</groupId>
		<artifactId>spring-boot-starter-validation</artifactId>
</dependency>
To retrieve the error messages, update the createPost() method to add BindingResult as parameter.
	@PostMapping("/posts")
	public Post createPost(@Valid @RequestBody Post post, BindingResult bindingResult) {
		if (bindingResult.hasErrors()) {
			System.out.println(bindingResult);
			return null;
		}
		return postRepository.save(post);
	}
Run the application and test it at http://localhost:8080/posts
To simulate the error, use below sample data.
{
    "title":null,
    "description":null,
    "content":null
}
Check the output/console and verify the error messages below.

What is MessageSource?
MessageSource is a powerful feature available in Spring applications. MessageSource is an interface that defines several methods for resolving messages. The ApplicationContext interface extends this interface so that all application contexts can resolve text messages. While working with validation API, we may want to display custom or user-friendly messages to the customer.
This helps application developers handle various complex scenarios with writing much extra code, such as environment-specific configuration, internationalization or configurable values.
Maven Dependencies
<dependency>
		<groupId>org.springframework.boot</groupId>
		<artifactId>spring-boot-starter-validation</artifactId>
</dependency>
Custom Validation Message Example
Let’s consider a scenario where we have to develop an application that supports multiple languages. If the user doesn’t provide the correct details as input, we’d like to show error messages according to the user’s locale.
import jakarta.validation.constraints.Email;
import jakarta.validation.constraints.NotEmpty;
import jakarta.validation.constraints.NotNull;

public class LoginForm {

	@NotEmpty(message = "{email.notempty}")
	@Email
	private String email;

	@NotNull
	private String password;

	public String getEmail() {
		return email;
	}

	public void setEmail(String email) {
		this.email = email;
	}

	public String getPassword() {
		return password;
	}

	public void setPassword(String password) {
		this.password = password;
	}
}
Defining the MessageSource Bean
An application context delegates the message resolution to a bean with the exact name messageSource.
ReloadableResourceBundleMessageSource is the most common MessageSource implementation that resolves messages from resource bundles for different locales.
@Bean
	public MessageSource messageSource() {
		ReloadableResourceBundleMessageSource messageSource = new ReloadableResourceBundleMessageSource();
		messageSource.setBasename("classpath:messages");
		messageSource.setDefaultEncoding("UTF-8");
Defining LocalValidatorFactoryBean
To use custom name messages in a properties file like we need to define a LocalValidatorFactoryBean and register the messageSource.
@Bean
	public LocalValidatorFactoryBean getValidator() {
		LocalValidatorFactoryBean bean = new LocalValidatorFactoryBean();
		bean.setValidationMessageSource(messageSource());
		return bean;
	}
Defining Property Files
The final step is to create a properties file in the src/main/resources directory.
# messages.properties
email.notempty=Please provide valid email id.
Here we can take advantage of internationalization along with this. Let’s say we want to show messages for a French user in their language.
In this case, we have to add one more property file with the name the messages_fr.properties in the same location (No code changes required at all):
# messages_fr.properties
email.notempty=Veuillez fournir un identifiant de messagerie valide.
Spring Modules
Overview
The Spring Framework contains a lot of features, which are well-organized in about twenty modules. These modules can be grouped together based on their primary features into Core Container, Data Access/Integration, Web, AOP (Aspect Oriented Programming), Instrumentation and Test. These groups are shown in the diagram below.

Core Container
The Core Container consists of the Core, Beans, Context and Expression modules.
The Core and Beans modules provide the most fundamental parts of the framework and provides the IoC and Dependency Injection features. The basic concept here is the BeanFactory which provides a sophisticated implementation of the factory pattern. It removes the need for programmatic singletons and allows you to decouple the configuration and specification of dependencies from your actual program logic.
The Context module build on the solid base provided by the Core and Beans modules: it provides a way to access objects in a framework-style manner in a fashion somewhat reminiscent of a JNDI-registry. The Context module inherits its features from the Beans module and adds support for internationalization (I18N) (using for example resource bundles), event-propagation, resource-loading, and the transparent creation of contexts by, for example, a servlet container. The Context module also contains support for some Java EE features like EJB, JMX and basic remoting support. The ApplicationContext interface is the focal point of the Context module that provides these features.
The Expression Language module provides a powerful expression language for querying and manipulating an object graph at runtime. It can be seen as an extension of the unified expression language (unified EL) as specified in the JSP 2.1 specification. The language supports setting and getting of property values, property assignment, method invocation, accessing the context of arrays, collections and indexers, logical and arithmetic operators, named variables, and retrieval of objects by name from Spring’s IoC container. It also supports list projection and selection, as well as common list aggregators.
Data Access/Integration
The Data Access/Integration layer consists of the JDBC, ORM, OXM, JMS and Transaction modules.
The JDBC module provides a JDBC-abstraction layer that removes the need to do tedious JDBC coding and parsing of database-vendor specific error codes.
The ORM module provides integration layers for popular object-relational mapping APIs, including JPA, JDO, Hibernate, and iBatis. Using the ORM package you can use all those O/R-mappers in combination with all the other features Spring offers, such as the simple declarative transaction management feature mentioned previously.
The OXM module provides an abstraction layer for using a number of Object/XML mapping implementations. Supported technologies include JAXB, Castor, XMLBeans, JiBX and XStream.
The JMS module provides Spring’s support for the Java Messaging Service. It contains features for both producing and consuming messages.
The Transaction module provides a way to do programmatic as well as declarative transaction management, not only for classes implementing special interfaces, but for all your POJOs (plain old Java objects).
Web
The Web layer consists of the Web, Web-Servlet and Web-Portlet modules.
Spring’s Web module provides basic web-oriented integration features, such as multipart file-upload functionality, the initialization of the IoC container using servlet listeners and a web-oriented application context. It also contains the web related parts of Spring’s remoting support.
The Web-Servlet module provides Spring’s Model-View-Controller (MVC) implementation for web-applications. Spring’s MVC framework is not just any old implementation; it provides a clean separation between domain model code and web forms and allows you to use all the other features of the Spring Framework.
The Web-Portlet module provides the MVC implementation to be used in a portlet environment and mirrors what is provided in the Web-Servlet module.
AOP and Instrumentation
Spring’s AOP module provides an AOP Alliance-compliant aspect-oriented programming implementation allowing you to define, for example, method-interceptors and pointcuts to cleanly decouple code implementing functionality that should logically speaking be separated. Using source-level metadata functionality you can also incorporate all kinds of behavioral information into your code, in a manner similar to that of .NET attributes.
There is also a separate Aspects module that provides integration with AspectJ.
The Instrumentation module provides class instrumentation support and classloader implementations to be used in certain application servers.
Test
The Test module contains the Test Framework that supports testing Spring components using JUnit or TestNG. It provides consistent loading of Spring ApplicationContexts and caching of those contexts. It also contains a number of Mock objects that are usful in many testing scenarios to test your code in isolation.
Spring Batch
Overview
Many applications within the enterprise domain require bulk processing to perform business operations in mission critical environments. These business operations include:
- Automated, complex processing of large volumes of information that is most efficiently processed without user interaction. These operations typically include time-based events (such as month-end calculations, notices, or correspondence).
- Periodic application of complex business rules processed repetitively across very large data sets (for example, insurance benefit determination or rate adjustments).
- Integration of information that is received from internal and external systems that typically requires formatting, validation, and processing in a transactional manner into the system of record. Batch processing is used to process billions of transactions every day for enterprises.
Spring Batch is a lightweight, comprehensive batch framework designed to enable the development of robust batch applications vital for the daily operations of enterprise systems. Spring Batch builds upon the characteristics of the Spring Framework that people have come to expect (productivity, POJO-based development approach, and general ease of use), while making it easy for developers to access and leverage more advance enterprise services when necessary. Spring Batch is not a scheduling framework. There are many good enterprise schedulers (such as Quartz, Tivoli, Control-M, etc.) available in both the commercial and open source spaces. It is intended to work in conjunction with a scheduler, not replace a scheduler.
Spring Batch provides reusable functions that are essential in processing large volumes of records, including logging/tracing, transaction management, job processing statistics, job restart, skip, and resource management. It also provides more advanced technical services and features that enable extremely high-volume and high performance batch jobs through optimization and partitioning techniques. Spring Batch can be used in both simple use cases (such as reading a file into a database or running a stored procedure) as well as complex, high volume use cases (such as moving high volumes of data between databases, transforming it, and so on). High-volume batch jobs can leverage the framework in a highly scalable manner to process significant volumes of information.
Usage Scenarios
A typical batch program generally:
- Reads a large number of records from a database, file, or queue.
- Processes the data in some fashion.
- Writes back data in a modified form.
Spring Batch automates this basic batch iteration, providing the capability to process similar transactions as a set, typically in an offline environment without any user interaction. Batch jobs are part of most IT projects, and Spring Batch is the only open source framework that provides a robust, enterprise-scale solution.
Business Scenarios
- Commit batch process periodically
- Concurrent batch processing: parallel processing of a job
- Staged, enterprise message-driven processing
- Massively parallel batch processing
- Manual or scheduled restart after failure
- Sequential processing of dependent steps (with extensions to workflow-driven batches)
- Partial processing: skip records (for example, on rollback)
- Whole-batch transaction, for cases with a small batch size or existing stored procedures/scripts
Technical Objectives
- Batch developers use the Spring programming model: Concentrate on business logic and let the framework take care of infrastructure.
- Clear separation of concerns between the infrastructure, the batch execution environment, and the batch application.
- Provide common, core execution services as interfaces that all projects can implement.
- Provide simple and default implementations of the core execution interfaces that can be used ‘out of the box’.
- Easy to configure, customize, and extend services, by leveraging the spring framework in all layers.
- All existing core services should be easy to replace or extend, without any impact to the infrastructure layer.
- Provide a simple deployment model, with the architecture JARs completely separate from the application, built using Maven.
Architecture
Spring Batch is designed with extensibility and a diverse group of end users in mind. The figure below shows the layered architecture that supports the extensibility and ease of use for end-user developers.
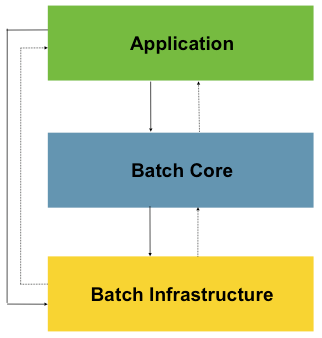
This layered architecture highlights three major high-level components: Application, Core, and Infrastructure. The application contains all batch jobs and custom code written by developers using Spring Batch. The Batch Core contains the core runtime classes necessary to launch and control a batch job. It includes implementations for JobLauncher, Job, and Step. Both Application and Core are built on top of a common infrastructure. This infrastructure contains common readers and writers and services (such as the RetryTemplate), which are used both by application developers(readers and writers, such as ItemReader and ItemWriter) and the core framework itself (retry, which is its own library).
For more information regarding general batch guidelines and principles, and batch processing strategies, please check out the documentation here.
Creating a Batch Service
Reference: http://Getting Started | Creating a Batch Service (spring.io)
A Simple Project – 1 hour (if time permits)
Tasks
- Create a microservice that implements REST CRUD
- GET, POST, PUT, DELETE
- DB: PostgreSQL
- Components
- Entity Classes
- Repositories
- Controllers
- Test with Postman