- Collections
- What is Relational Database?
- What is ORM?
- What is Spring Data JPA Auditing?
- PostgreSQL Database
- What is Database Migration?
Collections
Overview
The Java Collections Framework standardizes the way in which groups of objects are handled by your programs. Collections were not part of the original Java release but were added by J2SE 1.2. Prior to the Collections Framework, Java provided ad hoc classes such as Dictionary, Vector, Stack, and Properties to store and manipulate groups of objects.
Although these classes were quite useful, they lacked a central, unifying theme. The way that you used Vector was different from the way that you used Properties, for example. Also, this early, ad hoc approach was not designed to be easily extended or adapted. Collections were an answer to these (and other) problems.
Collection Framework
The Collections Framework was designed to meet several goals.
First, the framework had to be high-performance. The implementations for the fundamental collections (dynamic arrays, linked lists, trees, and hash tables) are highly efficient. You seldom, if ever, need to code one of these “data engines” manually.
Second, the framework had to allow different types of collections to work in a similar manner and with a high degree of interoperability.
Third, extending and/or adapting a collection had to be easy. Toward this end, the entire Collections Framework is built upon a set of standard interfaces. Several standard implementations (such as LinkedList, HashSet, and TreeSet) of these interfaces are provided that you may use as-is. You may also implement your own collection, if you choose. Various special-purpose implementations are created for your convenience, and some partial implementations are provided that make creating your own collection class easier.
Finally, mechanisms were added that allow the integration of standard arrays into the Collections Framework.
Collection Interfaces
The Collections Framework defines several core interfaces. This section provides an overview of each interface. Beginning with the collection interfaces is necessary because they determine the fundamental nature of the collection classes. Put differently, the concrete classes simply provide different implementations of the standard interfaces.
The interfaces that underpin collections are summarized in the following table:
| Interface | Description |
|---|---|
| Collection | Enables you to work with groups of objects; it is at the top of the collections hierarchy. |
| Deque | Extends Queue to handle a double-ended queue. |
| List | Extends Collection to handle sequences (lists of objects). |
| NavigableSet | Extends SortedSet to handle retrieval of elements based on closest-match searches. |
| Queue | Extends Collection to handle special types of lists in which elements are removed only from the head. |
| Set | Extends Collection to handle sets, which must contain unique elements. |
| SortedSet | Extends Set to handle sorted sets. |
In addition to the collection interfaces, collections also use the Comparator, RandomAccess, Iterator, ListIterator, and Spliterator interfaces, which are described in depth later in this chapter. Briefly, Comparator defines how two objects are compared; Iterator, ListIterator, and Spliterator enumerate the objects within a collection. By implementing RandomAccess, a list indicates that it supports efficient, random access to its elements.
Collection Examples
ArrayList
ArrayList supports dynamic arrays that can grow as needed. In Java, standard arrays are of a fixed length. After arrays are created, they cannot grow or shrink, which means that you must know in advance how many elements an array will hold. But, sometimes, you may not know until run time precisely how large an array you need. To handle this situation, the Collections Framework defines ArrayList. In essence, an ArrayList is a variable-length array of object references. That is, an ArrayList can dynamically increase or decrease in size. Array lists are created with an initial size. When this size is exceeded, the collection is automatically enlarged. When objects are removed, the array can be shrunk.
package com.example.collections;

import java.util.ArrayList;

public class ArrayListDemo {

	public static void main(String[] args) {
		// Create an array list.
		ArrayList<String> al = new ArrayList<String>();
		System.out.println("Initial size of al: " + al.size());

		// Add elements to the array list.
		al.add("C");
		al.add("A");
		al.add("E");
		al.add("B");
		al.add("D");
		al.add("F");
		al.add(1, "A2");
		System.out.println("Size of al after additions: " + al.size());

		// Display the array list.
		System.out.println("Contents of al: " + al);

		// Remove elements from the array list.
		al.remove("F");
		al.remove(2);
		System.out.println("Size of al after deletions: " + al.size());
		System.out.println("Contents of al: " + al);
	}

}
Obtaining an Array from an ArrayList
When working with ArrayList, you will sometimes want to obtain an actual array that contains the contents of the list. You can do this by calling toArray( ), which is defined by Collection. Several reasons exist why you might want to convert a collection into an array, such as:
- To obtain faster processing times for certain operations
- To pass an array to a method that is not overloaded to accept a collection
- To integrate collection-based code with legacy code that does not understand collections
package com.example.collections;

import java.util.ArrayList;

public class ArrayListToArray {

	public static void main(String[] args) {
		// Create an array list.
		ArrayList<Integer> al = new ArrayList<Integer>();

		// Add elements to the array list.
		al.add(1);
		al.add(2);
		al.add(3);
		al.add(4);

		System.out.println("Contents of al: " + al);

		// Get the array.
		Integer[] ia = new Integer[al.size()];
		ia = al.toArray(ia);

		int sum = 0;

		// Sum the array.
		for (int i : ia)
			sum += i;

		System.out.println("Sum is: " + sum);
	}

}
HashSet
HashSet extends AbstractSet and implements the Set interface. It creates a collection that uses a hash table for storage. It is important to note that HashSet does not guarantee the order of its elements, because the process of hashing doesn’t usually lend itself to the creation of sorted sets. If you need sorted storage, then another collection, such as TreeSet, is a better choice.
package com.example.collections;

import java.util.HashSet;

public class HashSetDemo {

	public static void main(String[] args) {
		// Create a hash set.
		HashSet<String> hs = new HashSet<String>();

		// Add elements to the hash set.
		hs.add("Beta");
		hs.add("Alpha");
		hs.add("Eta");
		hs.add("Gamma");
		hs.add("Epsilon");
		hs.add("Omega");

		System.out.println(hs);
	}

}
TreeSet
TreeSet extends AbstractSet and implements the NavigableSet interface. It creates a collection that uses a tree for storage. Objects are stored in sorted, ascending order. Access and retrieval times are quite fast, which makes TreeSet an excellent choice when storing large amounts of sorted information that must be found quickly.
package com.example.collections;

import java.util.TreeSet;

public class TreeSetDemo {

	public static void main(String[] args) {
		// Create a tree set.
		TreeSet<String> ts = new TreeSet<String>();

		// Add elements to the tree set.
		ts.add("C");
		ts.add("A");
		ts.add("B");
		ts.add("E");
		ts.add("F");
		ts.add("D");

		System.out.println(ts);
	}

}
ArrayDeque
The ArrayDeque class extends AbstractCollection and implements the Deque interface. It adds no methods of its own. ArrayDeque creates a dynamic array and has no capacity restrictions. (The Deque interface supports implementations that restrict capacity, but does not require such restrictions.)
package com.example.collections;

import java.util.ArrayDeque;

public class ArrayDequeDemo {

	public static void main(String[] args) {
		// Create an array deque.
		ArrayDeque<String> adq = new ArrayDeque<String>();

		// Use an ArrayDeque like a stack.
		adq.push("A");
		adq.push("B");
		adq.push("D");
		adq.push("E");
		adq.push("F");

		System.out.print("Popping the stack: ");

		while (adq.peek() != null)
			System.out.print(adq.pop() + " ");

		System.out.println();
	}

}
Using an Iterator
Before you can access a collection through an iterator, you must obtain one. Each of the collection classes provides an iterator( ) method that returns an iterator to the start of the collection. By using this iterator object, you can access each element in the collection, one element at a time. In general, to use an iterator to cycle through the contents of a collection, follow these steps:
- Obtain an iterator to the start of the collection by calling the collection’s iterator( ) method.
- Set up a loop that makes a call to hasNext( ). Have the loop iterate as long as hasNext( ) returns true.
- Within the loop, obtain each element by calling next( ).
package com.example.collections;

import java.util.ArrayList;
import java.util.Iterator;
import java.util.ListIterator;

public class IteratorDemo {

	public static void main(String[] args) {
		// Create an array list.
		ArrayList<String> al = new ArrayList<String>();

		// Add elements to the array list.
		al.add("C");
		al.add("A");
		al.add("E");
		al.add("B");
		al.add("D");
		al.add("F");

		// Use iterator to display contents of al.
		System.out.print("Original contents of al: ");
		Iterator<String> itr = al.iterator();
		while (itr.hasNext()) {
			String element = itr.next();
			System.out.print(element + " ");
		}
		System.out.println();

		// Modify objects being iterated.
		ListIterator<String> litr = al.listIterator();
		while (litr.hasNext()) {
			String element = litr.next();
			litr.set(element + "+");
		}

		System.out.print("Modified contents of al: ");
		itr = al.iterator();
		while (itr.hasNext()) {
			String element = itr.next();
			System.out.print(element + " ");
		}
		System.out.println();

		// Now, display the list backwards.
		System.out.print("Modified list backwards: ");
		while (litr.hasPrevious()) {
			String element = litr.previous();
			System.out.print(element + " ");
		}
		System.out.println();
	}

}
Spring – Injecting Collections
Reference: https://www.baeldung.com/spring-injecting-collections
Notes: can do this example in any existing spring boot application.
List with @Autowired
First, create an example bean. Here, a variable called nameList was declared to hold a list of string values. The list will be injected using @Autowired annotation.
public class CollectionsBean {
    	@Autowired
    	private List<String> nameList;
public void printNameList() {
        System.out.println(nameList);
    	}
}
Next, is to register CollectionsBean in the configuration setup class.
@Configuration
public class CollectionConfig {
	@Bean
	public CollectionsBean getCollectionsBean() {
		return new CollectionsBean();
	}

	@Bean
	public List<String> nameList() {
		return Arrays.asList("John", "Adam", "Harry", null);
	}
}
To test the program.
public class CollectionBeanTest {

	public static void main(String[] args) {
		ApplicationContext context = new AnnotationConfigApplicationContext(CollectionConfig.class);
		CollectionsBean collectionsBean = context.getBean(CollectionsBean.class);

		collectionsBean.printNameList();
}
The expected output would look like this.
[John, Adam, Harry, null]Set with Constructor Injection
To set up the same example with the Set collection, let’s modify the CollectionsBean class by adding below codes.
    private Set<String> nameSet;

    public CollectionsBean(Set<String> strings) {
        this.nameSet = strings;
    }

    public void printNameSet() {
        System.out.println(nameSet);
    }
Then update the configuration class with below codes.
@Bean
	public CollectionsBean getCollectionsBean() {
		return new CollectionsBean(new HashSet<>(Arrays.asList("John", "Adam", "Harry")));
	}
To test, add below codes to the test class.
collectionsBean.printNameSet();Here is the expected output.
[Adam, Harry, John]Map with Setter Injection
Following the same logic, let’s add the nameMap field to demonstrate the map injection.
private Map<Integer, String> nameMap;

    @Autowired
    public void setNameMap(Map<Integer, String> nameMap) {
        this.nameMap = nameMap;
    }

    public void printNameMap() {
        System.out.println(nameMap);
    }
Then add code below to configuration class.
@Bean
	public Map<Integer, String> nameMap() {
		Map<Integer, String> nameMap = new HashMap<>();
		nameMap.put(1, "John");
		nameMap.put(2, "Adam");
		nameMap.put(3, "Harry");
		return nameMap;
	}
To test it, add below codes to the test class.
collectionsBean.printNameMap();The expected output.
{1=John, 2=Adam, 3=Harry}Injecting Bean References
Let’s look at an example where we inject bean references as elements of the collection. First, let’s create the bean.
public class MyBean {

	private String name;

	public MyBean(String name) {
        this.name = name;
    }

	@Override
	public String toString() {
		return name;
	}

}
Then add a list of MyBean as a property to the CollectionBean class.
@Autowired(required = false)
    private List<MyBean> beanList;

    public void printBeanList() {
        System.out.println(beanList);
    }
Next, we add the Java configuration factory methods for each MyBean element.
@Bean
	public MyBean getElement() {
		return new MyBean("John");
	}

	@Bean
	public MyBean getAnotherElement() {
		return new MyBean("Adam");
	}

	@Bean
	public MyBean getOneMoreElement() {
		return new MyBean("Harry");
	}
To test, add below codes to the test class.
collectionsBean.printBeanList();The expected output.
[John, Adam, Harry]Using @Order to Sort Beans
We can specify the order of the beans while injecting into the collection. For that purpose, we use the @Order annotation and specify the index.
    @Bean
	@Order(2)
	public MyBean getElement() {
		return new MyBean("John");
	}

	@Bean
	@Order(3)
	public MyBean getAnotherElement() {
		return new MyBean("Adam");
	}

	@Bean
	@Order(1)
	public MyBean getOneMoreElement() {
		return new MyBean("Harry");
	}
Spring container first will inject the bean with the name “Harry”, as it has the lowest order value. It will then inject the “John”, and finally, the “Adam” bean.
[Harry, John, Adam]Using @Qualifier to Select Beans
We can use the @Qualifier to select the beans to be injected into the specific collection that matches the @Qualifier name.
    @Autowired(required = false)
    @Qualifier("CollectionsBean")
    private List<MyBean> beanList = new ArrayList<>();
Then, we mark with the same @Qualifier the beans that we want to inject into the List.
    @Bean
	@Qualifier("CollectionsBean")
	public MyBean getElement() {
		return new MyBean("John");
	}
In this example, we specify that the bean with the name “John” will be injected into the List named “CollectionsBean”. The results we test here.
[John]From the output, we see that our collection has only one element.
Setting an Empty List as a Default Value
We can set the default value for an injected List property as an empty list by using the Collections.emptyList() static method.
    @Value("${names.list:}#{T(java.util.Collections).emptyList()}")
    private List<String> nameListWithDefaultValue;


    public void printNameListWithDefaults() {
        System.out.println(nameListWithDefaultValue);
    }
If we run this with the “names.list” key not initialized via properties file.
collectionsBean.printNameListWithDefaults();We’ll get an empty list as output.
[]What is Relational Database?
Reference: https://www.codecademy.com/articles/what-is-rdbms-sql
What is a Database?
A database is a set of data stored in a computer. This data is usually structured in a way that makes the data easily accessible.
What is a Relational Database?
A relational database is a type of database. It uses a structure that allows us to identify and access data in relation to another piece of data in the database. Often, data in a relational database is organized into tables.
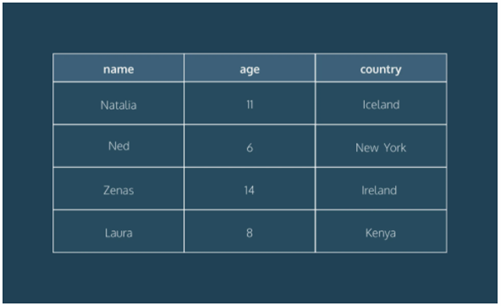
Tables: Rows and Columns
Tables can have hundreds, thousands, sometimes even millions of rows of data. These rows are often called records.
Tables can also have many columns of data. Columns are labelled with a descriptive name (say, age for example) and have a specific data type.
For example, a column called age may have a type of INTEGER (denoting the type of data it is meant to hold).
PostgreSQL Database
Get the Installer
- Download the installer from https://www.enterprisedb.com/downloads/postgres-postgresql-downloads
- Download the latest version available.
Begin Installation
- Installation steps.
- Make sure you have administrator privileges.
- Run the installer.
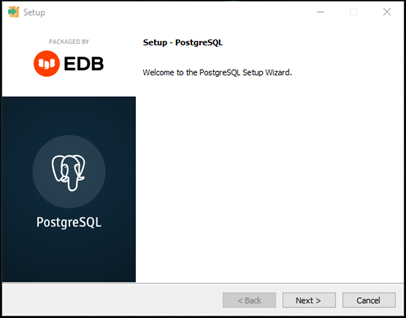
- On the Setup screen, click Next >
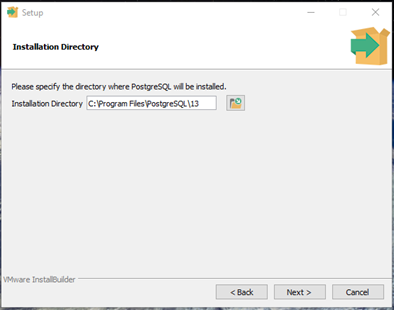
- In the Installation Directory step, accept the default settings, then click Next >
- In the Select Component step, uncheck Stack Builder and leave everything else, then click Next >
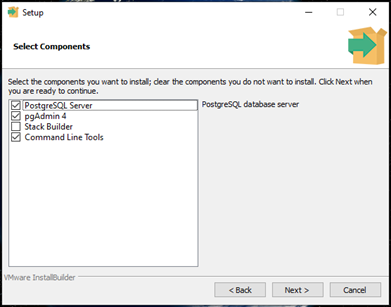
StackBuilder; a package manager that can be used to download and install additional PostgreSQL tools and drivers. Stackbuilder includes management, integration, migration, replication, geospatial, connectors and other tools.
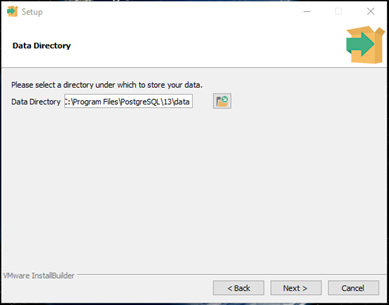
- In the Data Directory step, accept default value then click Next >
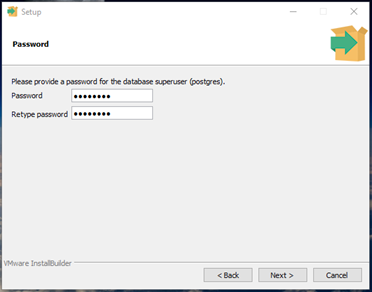
- In the Password step, enter the password for admin. Click Next >
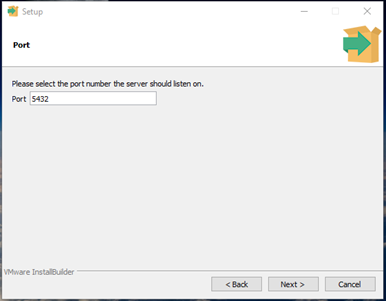
- In the Port step, accept the default value 5432 then click Next >
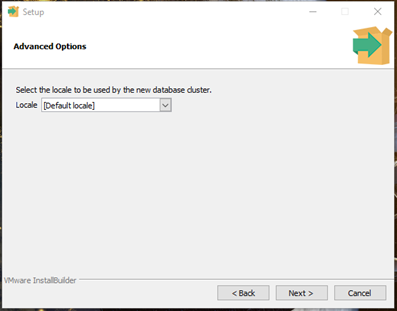
- In the Advanced Options step, accept default locale and click Next >
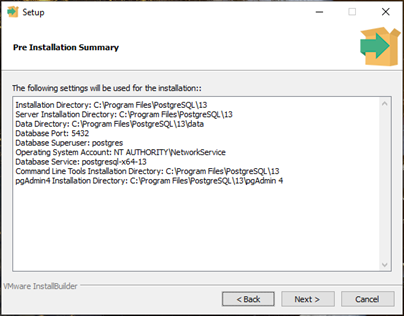
- In the Pre-Installation Summary, review the settings, then click Next >
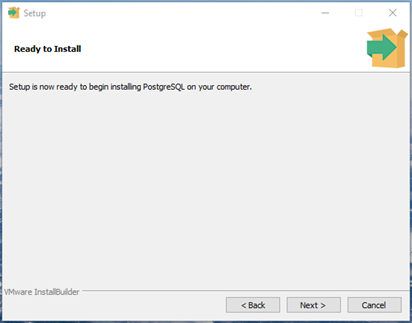
- In the Ready to Install screen, click Next >
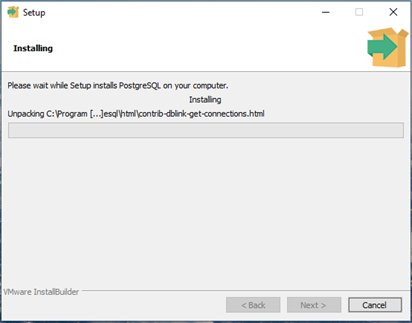
- Installation begins. Wait until it is completed.
- Once installation completed, click Finish to close the wizard.

What is ORM?
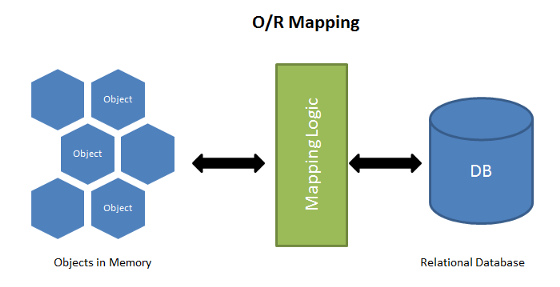
ORM sets the mapping between the set of objects which are written in the preferred programming language like JavaScript and relational database like SQL. It hides and encapsulates the SQL queries into objects and instead of SQL queries we can directly use the objects to implement the SQL query.
What is JPA?
The Java Persistence API (JPA) is a specification of Java. It is used to persist data between Java object and relational database. JPA acts as a bridge between object-oriented domain models and relational database systems.
As JPA is just a specification, it does not perform any operation by itself. It requires an implementation. So, ORM tools like Hibernate, TopLink and iBatis implements JPA specifications for data persistence.
What is Hibernate?
Hibernate is a Java framework that simplifies the development of Java application to interact with the database. It is an open source, lightweight, ORM (Object Relational Mapping) tool. Hibernate implements the specifications of JPA (Java Persistence API) for data persistence.
What is Spring Boot JPA?
Spring Boot JPA is a Java specification for managing relational data in Java applications. It allows us to access and persist data between Java object/ class and relational database.
JPA follows Object-Relation Mapping (ORM). It is a set of interfaces. It also provides a runtime EntityManager API for processing queries and transactions on the objects against the database.
It uses a platform-independent object-oriented query language JPQL (Java Persistent Query Language).
JPA Architecture
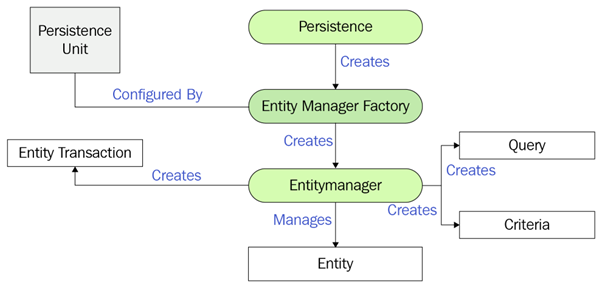
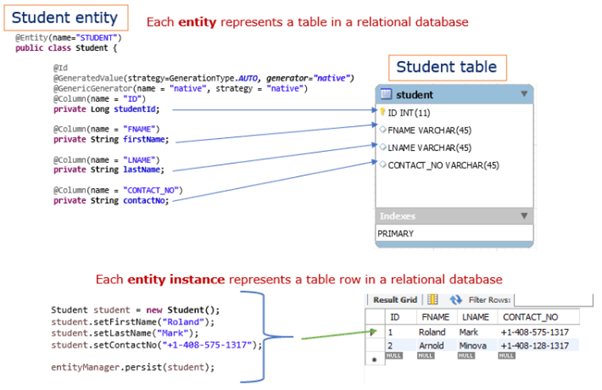
- Entity
- An entity is a persistence domain object. Each Entity represents a table in a relational database, and each entity instance corresponds to a row in that table.
- JPA uses Annotations or XML to map entities to a Relational database.
- The persistent state of an entity fields or properties (setter and getter methods) use object/relational mapping annotations to map the entities and entity relationships to the relational data in the underlying data store.
- Persistence Unit
- A persistence unit defines a set of all entity classes that are managed by EntityManager instances in an application.
- This set of entity classes represents the data contained within a single data store.
- Persistence units are defined by the persistence.xml configuration file.
- JPA uses the persistence.xml file to create the connection and setup the required environment. Provides information which is necessary for making database connections.
- Persistence Class
- Persistence (javax.persistence.Persistence) class contains java static methods to get EntityManagerFactory instances.
- Since JPA 2.1 you can generatedatabase schemas and/or tables and/or create DDL scripts as determined by the supplied properties.
- EntityManagerFactory
- EntityManagerFactory (javax.persistence.EntityManagerFactory) class is a factory for EntityManagers.
- During the application startup time EntityManagerFactory is created with the help of Persistence-Unit.
- Typically, EntityManagerFactory is created once (One EntityManagerfactory object per Database) and kept alive for later use.
- EntityManager
- a. EntityManager is an interface to perform main actual database interactions.
- Persistence Context
- A persistence context handles a set of entities which hold data to be persisted in some persistence store (e.g. database).
- Each EntityManager instance is associated with a PersistenceContext.
- EntityTransaction
- A transaction is a set of operations that either fail or succeed as a unit.
- A database transaction consists of a set of SQL operations that are committed or rolled back as a single unit
- Any kind of modifications initiated via EntityManager object are placed within a transaction. An EntityManager object helps creating an EntityTransaction
Example of Spring Data JPA
Reference: https://bezkoder.com/spring-boot-postgresql-example/
- Use Spring Initializr or STS to create a new project with below settings.
- Project: Maven
- Language: Java
- Spring Boot: default
- Group: com.example
- Artifact: spring-data-jpa-demo
- Name: spring-data-jpa-demo
- Description: Demo project for Spring Data JPA
- Package name: com.example.spring-data-jpa-demo
- Packaging: Jar
- Java: 17 or 21
- Dependencies: Spring Web, Spring Data JPA, PostgreSQL Driver
- Click Generate. Extract the downloaded zip file then import it into Eclipse.
Add Spring Data JPA dependency into existing project
If you have already an existing Maven project and want to add Spring Data JPA dependency, add below codes into pom.xml
<dependency>
	<groupId>org.springframework.boot</groupId>
	<artifactId>spring-boot-starter-data-jpa</artifactId>
</dependency>
Connect to PostgreSQL database
Add below configurations into application.properties file
spring.datasource.url=jdbc:postgresql://localhost:5432/testdb
spring.datasource.username=postgres
spring.datasource.password=123
spring.jpa.properties.hibernate.jdbc.lob.non_contextual_creation=true
spring.jpa.properties.hibernate.dialect=org.hibernate.dialect.PostgreSQLDialect
# Hibernate ddl auto (create, create-drop, validate, update)
spring.jpa.hibernate.ddl-auto=update
#show sql values
logging.level.org.hibernate.type.descriptor.sql=trace
logging.level.org.hibernate.type.descriptor.sql.BasicBinder=TRACE
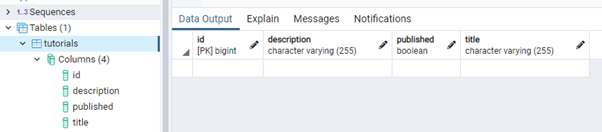
logging.level.org.hibernate.SQL=DEBUGCreate JPA entity class to represent a table
Our Data model is Tutorial with four fields: id, title, description, published.
package com.example.springbootjpademo;

import jakarta.persistence.Column;
import jakarta.persistence.Entity;
import jakarta.persistence.GeneratedValue;
import jakarta.persistence.GenerationType;
import jakarta.persistence.Id;
import jakarta.persistence.Table;

@Entity
@Table(name = "tutorials")
public class Tutorial {

	@Id
	@GeneratedValue(strategy = GenerationType.AUTO)
	private long id;

	@Column(name = "title")
	private String title;

	@Column(name = "description")
	private String description;

	@Column(name = "published")
	private boolean published;

	public Tutorial() {

	}

	public Tutorial(String title, String description, boolean published) {
		this.title = title;
		this.description = description;
		this.published = published;
	}

	public long getId() {
		return id;
	}

	public String getTitle() {
		return title;
	}

	public void setTitle(String title) {
		this.title = title;
	}

	public String getDescription() {
		return description;
	}

	public void setDescription(String description) {
		this.description = description;
	}

	public boolean isPublished() {
		return published;
	}

	public void setPublished(boolean isPublished) {
		this.published = isPublished;
	}

	@Override
	public String toString() {
		return "Tutorial [id=" + id + ", title=" + title + ", desc=" + description + ", published=" + published + "]";
	}
}
Create a CRUD Repository interface for JPA entity
Let us create a repository to interact with Tutorials from the database.
package com.example.springbootjpademo;

import java.util.List;
import org.springframework.data.jpa.repository.JpaRepository;

public interface TutorialRepository extends JpaRepository<Tutorial, Long> {

	List<Tutorial> findByPublished(boolean published);

	List<Tutorial> findByTitleContaining(String title);
}
Using Spring JPA Query Method
Now we can use JpaRepository’s methods: save(), findOne(), findById(), findAll(), count(), delete(), deleteById()… without implementing these methods.
Using CRUD Repository interface in REST Controller
Finally, we create a controller that provides APIs for creating, retrieving, updating, deleting and finding Tutorials.
package com.example.springbootjpademo;

import java.util.ArrayList;
import java.util.List;
import java.util.Optional;

import org.springframework.beans.factory.annotation.Autowired;
import org.springframework.http.HttpStatus;
import org.springframework.http.ResponseEntity;
import org.springframework.web.bind.annotation.CrossOrigin;
import org.springframework.web.bind.annotation.DeleteMapping;
import org.springframework.web.bind.annotation.GetMapping;
import org.springframework.web.bind.annotation.PathVariable;
import org.springframework.web.bind.annotation.PostMapping;
import org.springframework.web.bind.annotation.PutMapping;
import org.springframework.web.bind.annotation.RequestBody;
import org.springframework.web.bind.annotation.RequestMapping;
import org.springframework.web.bind.annotation.RequestParam;
import org.springframework.web.bind.annotation.RestController;


@RestController
@RequestMapping("/api")
public class TutorialController {

	@Autowired
	TutorialRepository tutorialRepository;

	@GetMapping("/tutorials")
	public ResponseEntity<List<Tutorial>> getAllTutorials(@RequestParam(required = false) String title) {
		try {
			List<Tutorial> tutorials = new ArrayList<Tutorial>();

			if (title == null)
				tutorialRepository.findAll().forEach(tutorials::add);
			else
				tutorialRepository.findByTitleContaining(title).forEach(tutorials::add);

			if (tutorials.isEmpty()) {
				return new ResponseEntity<>(HttpStatus.NO_CONTENT);
			}

			return new ResponseEntity<>(tutorials, HttpStatus.OK);
		} catch (Exception e) {
			return new ResponseEntity<>(null, HttpStatus.INTERNAL_SERVER_ERROR);
		}
	}

	@GetMapping("/tutorials/{id}")
	public ResponseEntity<Tutorial> getTutorialById(@PathVariable("id") long id) {
		Optional<Tutorial> tutorialData = tutorialRepository.findById(id);

		if (tutorialData.isPresent()) {
			return new ResponseEntity<>(tutorialData.get(), HttpStatus.OK);
		} else {
			return new ResponseEntity<>(HttpStatus.NOT_FOUND);
		}
	}

	@PostMapping("/tutorials")
	public ResponseEntity<Tutorial> createTutorial(@RequestBody Tutorial tutorial) {
		try {
			Tutorial _tutorial = tutorialRepository
					.save(new Tutorial(tutorial.getTitle(), tutorial.getDescription(), false));
			return new ResponseEntity<>(_tutorial, HttpStatus.CREATED);
		} catch (Exception e) {
			return new ResponseEntity<>(null, HttpStatus.INTERNAL_SERVER_ERROR);
		}
	}

	@PutMapping("/tutorials/{id}")
	public ResponseEntity<Tutorial> updateTutorial(@PathVariable("id") long id, @RequestBody Tutorial tutorial) {
		Optional<Tutorial> tutorialData = tutorialRepository.findById(id);

		if (tutorialData.isPresent()) {
			Tutorial _tutorial = tutorialData.get();
			_tutorial.setTitle(tutorial.getTitle());
			_tutorial.setDescription(tutorial.getDescription());
			_tutorial.setPublished(tutorial.isPublished());
			return new ResponseEntity<>(tutorialRepository.save(_tutorial), HttpStatus.OK);
		} else {
			return new ResponseEntity<>(HttpStatus.NOT_FOUND);
		}
	}

	@DeleteMapping("/tutorials/{id}")
	public ResponseEntity<HttpStatus> deleteTutorial(@PathVariable("id") long id) {
		try {
			tutorialRepository.deleteById(id);
			return new ResponseEntity<>(HttpStatus.NO_CONTENT);
		} catch (Exception e) {
			return new ResponseEntity<>(HttpStatus.INTERNAL_SERVER_ERROR);
		}
	}

	@DeleteMapping("/tutorials")
	public ResponseEntity<HttpStatus> deleteAllTutorials() {
		try {
			tutorialRepository.deleteAll();
			return new ResponseEntity<>(HttpStatus.NO_CONTENT);
		} catch (Exception e) {
			return new ResponseEntity<>(HttpStatus.INTERNAL_SERVER_ERROR);
		}

	}

	@GetMapping("/tutorials/published")
	public ResponseEntity<List<Tutorial>> findByPublished() {
		try {
			List<Tutorial> tutorials = tutorialRepository.findByPublished(true);

			if (tutorials.isEmpty()) {
				return new ResponseEntity<>(HttpStatus.NO_CONTENT);
			}
			return new ResponseEntity<>(tutorials, HttpStatus.OK);
		} catch (Exception e) {
			return new ResponseEntity<>(HttpStatus.INTERNAL_SERVER_ERROR);
		}
	}
}
Run and Test
- Run the project.
- Use Postman to test the service.
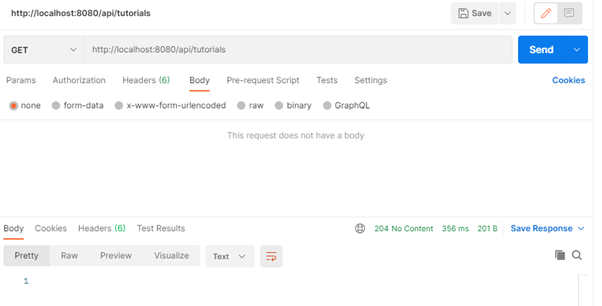
- Table tutorials will be automatically generated in database.
- Try to insert a new tutorial record by sending a POST request.
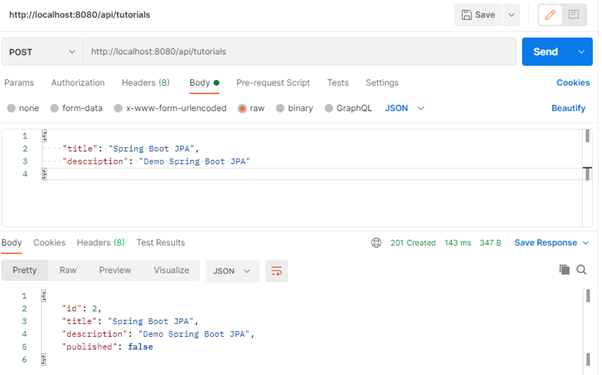
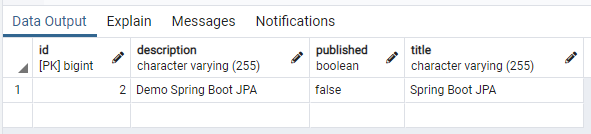
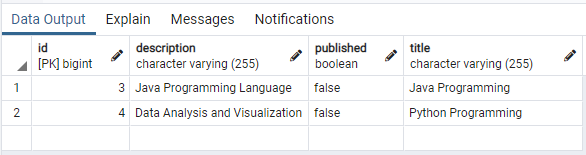
- Verify that the new record is added into table tutorials.
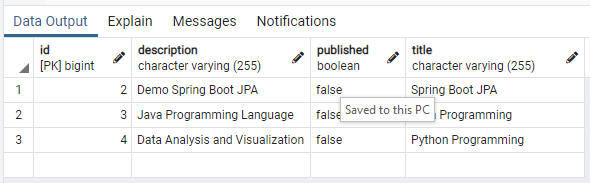
- Try to add another few records into the table and verify.
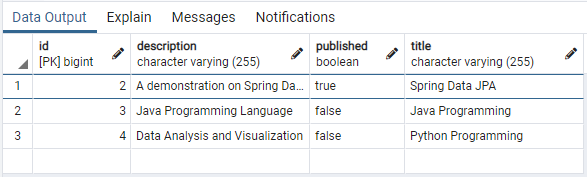
- Try to update existing record.

- Verify the update in table tutorials.
- Get all tutorial records.
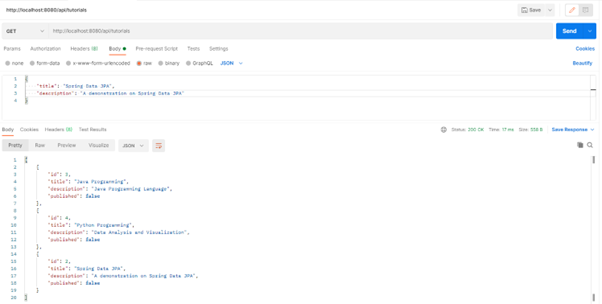
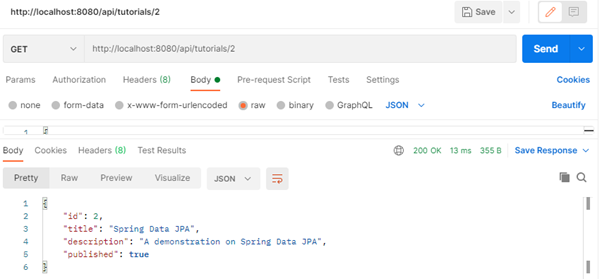
- Get a record by id.
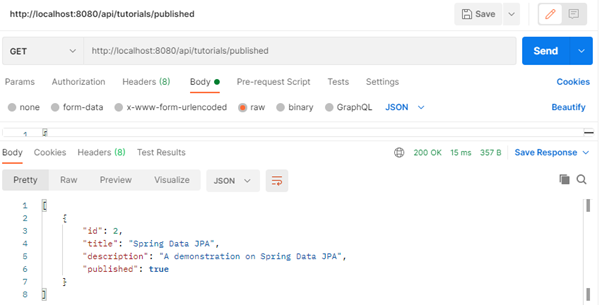
- Find all published tutorials.
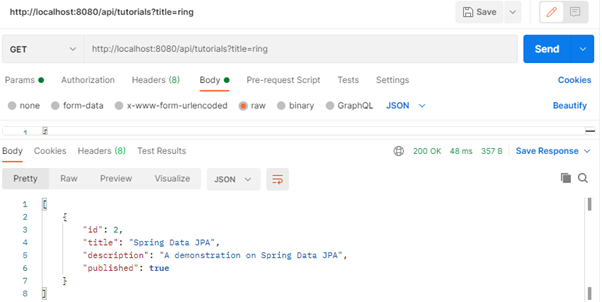
- Find all tutorials which title contains ‘ring’.
- Delete a tutorial record.
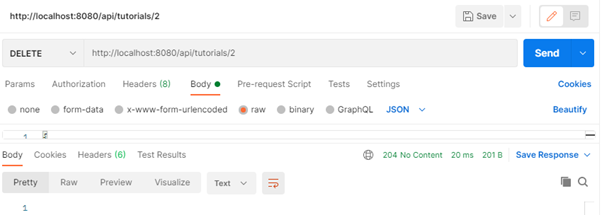
- Verify record deleted in database.
- Finally, delete all records in table.
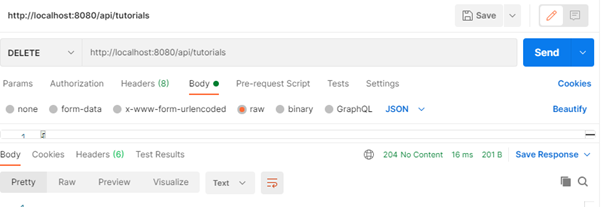
- Verify table is now empty.

H2 Database as Embedded In-Memory Database
Reference: https://www.h2database.com/html/main.html
H2 is one of the popular in-memory databases written in Java. It can be embedded in Java applications or run in the client-server mode.
Example of H2 Database
Reference: https://howtodoinjava.com/spring-boot2/h2-database-example/
Example on how to configure H2 database with Spring boot to create and use an in-memory database in runtime, generally for unit testing or POC purposes. Remember an in-memory database is created/initialized when an application starts up; and destroyed when the application shuts down.
- Use Spring Initializr or STS to create a new project with below settings
- Project: Maven
- Language: Java
- Spring Boot: default
- d. Group: com.example
- Artifact: h2-demo
- Name: h2-demo
- Description: Demo project for Spring Data JPA
- Package name: com.example.h2-demo
- Packaging: Jar
- Java: 17 or 21
- Dependencies: Spring Web, Spring Data JPA, H2 Database
- Click Generate. Extract the downloaded zip file then import it into Eclipse.
H2 Configuration Options
Spring provides very easy configuration options to connect to any database using simple properties. Below are the configuration properties
spring.datasource.url=jdbc:h2:mem:testdb
spring.datasource.driverClassName=org.h2.Driver
spring.datasource.username=sa
spring.datasource.password=
spring.jpa.database-platform=org.hibernate.dialect.H2Dialect

# auto execute sql
spring.jpa.hibernate.ddl-auto=update

# Enabling H2 Console
spring.h2.console.enabled=true

# Custom H2 Console URL
spring.h2.console.path=/h2
Please note by default, Spring Boot configures the in-memory database connection with the username ‘sa’ and an empty password ‘ ‘. If you wish to change these values, override them in above properties options.
Configure data persistence
The in-memory databases are volatile, by default, and all stored data will be lost when we restart the application. In this case, data is written in temporary memory and as soon as JVM is stopped, data is flushed.
To have a persistent data store, which is capable to storing data between application start/stop, we should store the data in files. For this change the spring.datasource.url property.
Update application.properties with below codes (choose either one only).
# temporary data storage
spring.datasource.url = jdbc:h2:mem:testdb

# temporary data storage
spring.datasource.url = jdbc:h2:file:/data/sample
spring.datasource.url = jdbc:h2:file:C:/data/sample (Windows only)
Create schema and insert data on initialization
We may want to initialize database with some fixed schema (DDL) and insert default data (DML) into tables before the application is ready is run business usecases.
We can achieve this by putting sql files into resources folder (/src/main/resources/).
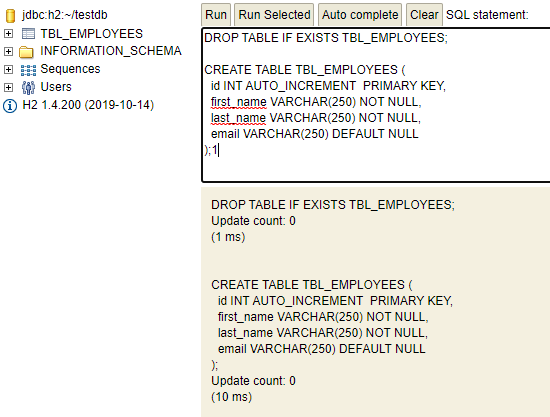
- schema.sql – To initialize the schema ie.create tables and dependencies.
- data.sql – To insert default data rows.
# schema.sql
DROP TABLE IF EXISTS TBL_EMPLOYEES;
CREATE TABLE TBL_EMPLOYEES (
id INT AUTO_INCREMENT PRIMARY KEY,
first_name VARCHAR(250) NOT NULL,
last_name VARCHAR(250) NOT NULL,
email VARCHAR(250) DEFAULT NULL
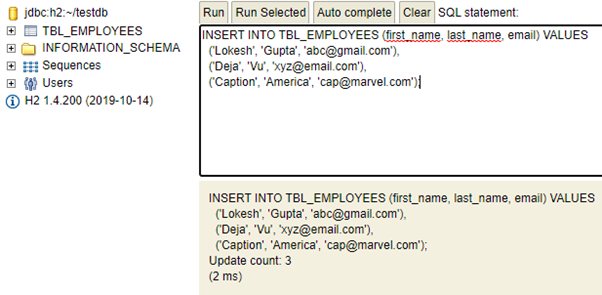
);# data.sql
INSERT INTO TBL_EMPLOYEES (first_name, last_name, email) VALUES
('Lokesh', 'Gupta', 'abc@gmail.com'),
('Deja', 'Vu', 'xyz@email.com'),
('Caption', 'America', 'cap@marvel.com');
Enable H2 Web Console
By default, the console view of H2 database is disabled. We must enable it to view and access it in browser. Note that we can customize the URL of H2 console which, by default, is ‘/h2’.
To enable, add below codes into application.properties
# Enabling H2 Console
spring.h2.console.enabled=true

# Custom H2 Console URL
spring.h2.console.path=/h2
H2 Database Engine (optional)
- Download the installer from https://www.h2database.com/html/main.html
- Run the installer.
Accessing H2 Web Console
Start the spring boot application and access the console in browser with URL: http://localhost:8080/h2
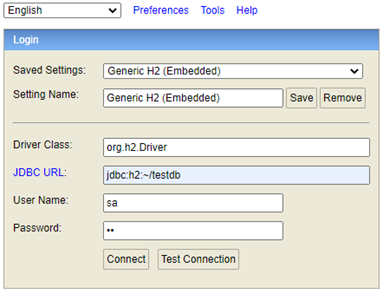
Now enter the configured username and password. We can verify the table structure and default data inserted through SQL files.
Use this datasource URL instead: jdbc:h2:mem:testdb

What is Spring Data JPA Auditing?
Reference: https://rashidi.github.io/spring-boot-data-audit/
Spring Data Jpa provides auditing feature which includes @CreateDate, @CreatedBy, @LastModifiedDate, and @LastModifiedBy.
Enable JPA Auditing
To enable JPA Auditing for this project will need to apply three annotations and a configuration class. Those annotations are @EntityListener, @CreatedDate, and @LastModifiedDate.
@EntityListener will be the one that is responsible to listen to any create or update activity. It requires Listeners to be defined. In this example we will use the default class, EntityListeners.
By annotating a column with @CreatedDate we will inform Spring that we need this column to have information on when the entity is created. While @LastModifiedDate column will be defaulted to @CreatedDate and will be updated to the current time when the entry is updated.
Example on JPA Auditing
Enable auditing with Spring Data Jpa’s @CreatedDate and @LastModified
Background
Spring Data Jpa provides auditing feature which includes @CreateDate, @CreatedBy, @LastModifiedDate, and @LastModifiedBy. In this example we will see how it can be implemented with very little configurations.
Entity Class
In this example we have an entity class, User which contains information about the table structure.
package com.example.jpademo;

import java.time.LocalDateTime;

import org.springframework.data.annotation.CreatedBy;
import org.springframework.data.annotation.CreatedDate;
import org.springframework.data.annotation.LastModifiedBy;
import org.springframework.data.annotation.LastModifiedDate;
import org.springframework.data.jpa.domain.support.AuditingEntityListener;

import jakarta.persistence.Column;
import jakarta.persistence.Entity;
import jakarta.persistence.EntityListeners;
import jakarta.persistence.GeneratedValue;
import jakarta.persistence.Id;
import jakarta.persistence.Table;

@Entity
@EntityListeners(AuditingEntityListener.class)
@Table(name = "users")
public class User {

	@Id
	@GeneratedValue
	private Long id;

	@Column(nullable = false)
	private String name;

	@Column(nullable = false)
	private String username;

	@CreatedBy
	@Column(nullable = false, updatable = false)
	private String createdBy;

	@CreatedDate
	@Column(nullable = false, updatable = false)
	private LocalDateTime created;

	@LastModifiedBy
	@Column(nullable = false)
	private String modifiedBy;

	@LastModifiedDate
	@Column(nullable = false)
	private LocalDateTime modified;

	public User() {
	}

	public User(String name, String username) {
		this.name = name;
		this.username = username;
	}

	public Long getId() {
		return id;
	}

	public void setId(Long id) {
		this.id = id;
	}

	public String getName() {
		return name;
	}

	public void setName(String name) {
		this.name = name;
	}

	public String getUsername() {
		return username;
	}

	public void setUsername(String username) {
		this.username = username;
	}

	public String getCreatedBy() {
		return createdBy;
	}

	public void setCreatedBy(String createdBy) {
		this.createdBy = createdBy;
	}

	public LocalDateTime getCreated() {
		return created;
	}

	public void setCreated(LocalDateTime created) {
		this.created = created;
	}

	public String getModifiedBy() {
		return modifiedBy;
	}

	public void setModifiedBy(String modifiedBy) {
		this.modifiedBy = modifiedBy;
	}

	public LocalDateTime getModified() {
		return modified;
	}

	public void setModified(LocalDateTime modified) {
		this.modified = modified;
	}
}
As you can see it is a standard implementation of @Entity JPA class. We would like to keep track when an entry is created with created column and when it is modified with modified column.
Enable JpaAudit
In order to enable JPA Auditing for this project will need to apply three annotations and a configuration class. Those annotations are; @EntityListener, @CreatedDate, and @LastModifiedDate.
@EntityListener will be the one that is responsible to listen to any create or update activity. It requires Listeners to be defined. In this example we will use the default class, EntityListeners.
By annotating a column with @CreatedDate we will inform Spring that we need this column to have information on when the entity is created. While @LastModifiedDate column will be defaulted to @CreatedDate and will be updated to the current time when the entry is updated.
As you can see User is now annotated with @EntityListeners while created, createdBy, modified, and modifiedBy columns are annotated with @CreatedDate, @CreatedBy, @LastModifiedDate, and @LastModifiedBy. createdBy and modifiedBy fields will be automatically populated if Spring Security is available in the project path. Alternatively we wil implement our own AuditorAware in order to inform Spring who is the current auditor.
In AuditorAwareImpl we can see that current implementation Mr. Auditor is hardcoded as the current auditor. You can replace the implementation to assign the current auditor.
package com.example.jpademo;

import java.util.Optional;
import org.springframework.data.domain.AuditorAware;

public class AuditorAwareImpl implements AuditorAware<String> {

	@Override
    public Optional<String> getCurrentAuditor() {
        return Optional.of("Mr. Auditor");
    }
}
Next we will need to create a Configuration class to enable JpaAuditing. In this project we have AuditConfiguration class which is responsible to inform Spring Data that we would like to enable Auditing and to use our own AuditorAware implementation. This can be achieved by registering AuditorAware @Bean and @EnableJpaAuditing annotation along with auditorAwareRef configuration.
package com.example.jpademo;

import org.springframework.context.annotation.Bean;
import org.springframework.context.annotation.Configuration;
import org.springframework.data.domain.AuditorAware;
import org.springframework.data.jpa.repository.config.EnableJpaAuditing;

@Configuration
@EnableJpaAuditing(auditorAwareRef = "auditorProvider")
public class AuditConfiguration {

	@Bean
    public AuditorAware<String> auditorProvider() {
        return new AuditorAwareImpl();
    }
}
That’s it! Our application has JPA Auditing feature enabled.
Verify Audit Implementation
To test the implementation, we are going to create UserRepository and UserController.
package com.example.jpademo;

import org.springframework.data.jpa.repository.JpaRepository;

public interface UserRepository extends JpaRepository<User, Long> {

}
Next, create the UserController class that contains the service’s methods.
package com.example.jpademo;

import java.util.ArrayList;
import java.util.List;
import java.util.Optional;

import org.springframework.beans.factory.annotation.Autowired;
import org.springframework.http.HttpStatus;
import org.springframework.http.ResponseEntity;
import org.springframework.web.bind.annotation.DeleteMapping;
import org.springframework.web.bind.annotation.GetMapping;
import org.springframework.web.bind.annotation.PathVariable;
import org.springframework.web.bind.annotation.PostMapping;
import org.springframework.web.bind.annotation.PutMapping;
import org.springframework.web.bind.annotation.RequestBody;
import org.springframework.web.bind.annotation.RequestMapping;
import org.springframework.web.bind.annotation.RestController;

@RestController
@RequestMapping("/api")
public class UserController {

	@Autowired
	private UserRepository userRepository;

	@GetMapping("/users")
	public ResponseEntity<List<User>> getAllUsers() {
		try {
			List<User> users = new ArrayList<User>();

			userRepository.findAll().forEach(users::add);

			if (users.isEmpty()) {
				return new ResponseEntity<>(HttpStatus.NO_CONTENT);
			}

			return new ResponseEntity<>(users, HttpStatus.OK);
		} catch (Exception e) {
			return new ResponseEntity<>(null, HttpStatus.INTERNAL_SERVER_ERROR);
		}
	}

	@PostMapping("/users")
	public ResponseEntity<User> createUser(@RequestBody User user) {
		try {
			User _user = userRepository.save(new User(user.getName(),
					user.getUsername()));
			return new ResponseEntity<>(_user, HttpStatus.CREATED);
		} catch (Exception e) {
			return new ResponseEntity<>(null, HttpStatus.INTERNAL_SERVER_ERROR);
		}
	}

	@PutMapping("/users/{id}")
	public ResponseEntity<User> updateUser(@PathVariable("id") long id,
			@RequestBody User user) {
		Optional<User> userData = userRepository.findById(id);

		if (userData.isPresent()) {
			User _user = userData.get();
			_user.setName(user.getName());
			_user.setUsername(user.getUsername());

			return new ResponseEntity<>(userRepository.save(_user),
					HttpStatus.OK);
		} else {
			return new ResponseEntity<>(HttpStatus.NOT_FOUND);
		}
	}

	@GetMapping("/users/{id}")
	public ResponseEntity<User> getTutorialById(@PathVariable("id") long id) {
		Optional<User> userData = userRepository.findById(id);

		if (userData.isPresent()) {
			return new ResponseEntity<>(userData.get(), HttpStatus.OK);
		} else {
			return new ResponseEntity<>(HttpStatus.NOT_FOUND);
		}
	}

	@DeleteMapping("/users/{id}")
	public ResponseEntity<HttpStatus> deleteUser(@PathVariable("id") long id) {
		try {
			userRepository.deleteById(id);
			return new ResponseEntity<>(HttpStatus.NO_CONTENT);
		} catch (Exception e) {
			return new ResponseEntity<>(HttpStatus.INTERNAL_SERVER_ERROR);
		}
	}

	@DeleteMapping("/users")
	public ResponseEntity<HttpStatus> deleteAllUsers() {
		try {
			userRepository.deleteAll();
			return new ResponseEntity<>(HttpStatus.NO_CONTENT);
		} catch (Exception e) {
			return new ResponseEntity<>(HttpStatus.INTERNAL_SERVER_ERROR);
		}

	}
}
Run the application and test it using Postman.
What is Database Migration?
Database migration – in the context of enterprise applications – means moving your data from one platform to another. There are many reasons you might want to move to a different platform.
For example, a company might decide to save money by moving to a cloud-based database. Or a company might find that some database software has features that are critical for their business needs. Or the legacy systems are simply outdated.
The process of database migration can involve multiple phases and iterations – including assessing the current databases and future needs of the company, migrating the schema, and normalizing and moving the data. Plus, testing, testing, and more testing.
What is Flyway?
Reference: https://flywaydb.org/
Flyway is a tool, developed by Boxfuse, that enables developers to apply version control practices to the database that supports a Java application. With it, we can tightly integrate plain SQL scripts in the lifecycle of an application, guaranteeing that its database will always be compatible without manual intervention.
How Does Flyway Work?
Flyway works by checking the current version of the database and by applying new migrations automatically before the rest of the application starts. Whenever a developer needs to change the schema of a database or to issue some changes to the data residing on it, they need to create a SQL script following a name convention in the directory read by Flyway. Usually, this directory is classpath:db/migration, but one can change the default value if needed.
Flyway’s name convention consists of:
- Prefix: Defaults to V.
- Version: Dots or underscores separated in as many parts as one likes.
- Separator: Defaults to __ (two underscores) and separates the version from the description.
- Description: A text with words separated by underscores or spaces.
- Suffix: Defaults to .sql.
Using Flyway to version control database
Reference: https://dzone.com/articles/database-versioning-with-flyway-and-java
To better understand how Flyway and other solutions that handle version control of databases can help us, let us do a practical exercise. We will start with an empty Spring Boot application where we will first add a Customer entity with contact details (contact name, email address and phone) directly on it. We will use Flyway to create the database schema (a single table) with some data. We will also create one RESTful endpoint that will be used to retrieve all the persisted customers.
After creating this first version of our application, we then will refactor it to extract contact details to an entity of its own, Contact. This new entity will make it possible to add more than one contact to a Customer. In this process, we will use Flyway again to create the second table, contact, and to migrate the pre-existing customers’ contacts.
Database: PostgreSQL14 (or later)
- Current version of Flyway only tested with PostgreSQL 15 (as of 6th October 2023) but to make it work with later PostgreSQL, add this line to application.properties file
# add this line to fix flyway migration error
spring.flyway.baselineOnMigrate=true- Create new empty project using Spring Initializr or STS
- Project: Maven
- Language: Java
- Spring Boot: default
- Group: com.example
- Artifact: flywaydemo
- Name: flywaydemo
- Description: Flyway Demo project for Spring Data JPA
- Package name: com.example.flywaydemo
- Packaging: Jar
- Java: 17 or 21
- Dependencies: Spring Web, Spring Data JPA, PostgreSQL Driver, Flyway Migration
- Click Generate. Extract the downloaded zip file then import it into Eclipse.
- To create our customer table, and populate it with a few records, we will create a SQL script in the src/main/resources/db/migration/ folder. Flyway, as stated before, organizes its scripts based on the numeric part of the naming pattern. As this will be our first script, we will create the file naming it as V1__customers.sql
create table customer (
  id serial primary key,
  name varchar(255) not null,
  contact_name varchar (255) not null,
  email varchar (255) not null,
  phone varchar (255) not null
);

insert into customer (name, contact_name, email, phone) values
  ('Coca Cola', 'John Doe', 'john.doe@cocacola.com', '202-555-0143'),
  ('Dell', 'Bob Frapples', 'bob.frapples@dell.com', '202-555-0180'),
  ('Apple', 'Barb Ackue', 'barb.ackue@apple.com', '202-555-0128'),
  ('Google', 'Sue Vaneer', 'sue.vaneer@google.com', '202-555-0174'),
  ('FedEx', 'Robin Banks', 'robin.banks@fedex.com', '202-555-0146'),
('Salesforce', 'Zack Lee', 'zack.lee@salesforce.com', '202-555-0122');- Updated application.properties
spring.datasource.url=jdbc:postgresql://localhost:5432/testdb
spring.datasource.username=postgres
spring.datasource.password=Pa$$w0rd

spring.jpa.properties.hibernate.jdbc.lob.non_contextual_creation=true
spring.jpa.properties.hibernate.dialect=org.hibernate.dialect.PostgreSQLDialect

# Hibernate ddl auto (create, create-drop, validate, update)
spring.jpa.hibernate.ddl-auto=update

#show sql values
logging.level.org.hibernate.type.descriptor.sql=trace
logging.level.org.hibernate.type.descriptor.sql.BasicBinder=TRACE
logging.level.org.hibernate.SQL=DEBUG
#flyway settings
spring.flyway.baselineOnMigrate=true- Create a Customer entity class.
import jakarta.persistence.Entity;
import jakarta.persistence.GeneratedValue;
import jakarta.persistence.GenerationType;
import jakarta.persistence.Id;

@Entity
public class Customer {

	@Id
	@GeneratedValue(strategy = GenerationType.IDENTITY)
	private Long id;

	private String name;
	private String contactName;
	private String email;
	private String phone;

		public Customer() {

	}

	public Long getId() {
		return id;
	}

	public void setId(Long id) {
		this.id = id;
	}

	public String getName() {
		return name;
	}

	public void setName(String name) {
		this.name = name;
	}

	public String getContactName() {
		return contactName;
	}

	public void setContactName(String contactName) {
		this.contactName = contactName;
	}

	public String getEmail() {
		return email;
	}

	public void setEmail(String email) {
		this.email = email;
	}

	public String getPhone() {
		return phone;
	}

	public void setPhone(String phone) {
		this.phone = phone;
	}

}- Create an interface called CustomerRepository.
import org.springframework.data.jpa.repository.JpaRepository;

public interface CustomerRepository extends JpaRepository<Customer, Long> {

}- Create a controller class called CustomerController.
import java.util.List;

import org.springframework.beans.factory.annotation.Autowired;
import org.springframework.web.bind.annotation.RequestMapping;
import org.springframework.web.bind.annotation.RequestMethod;
import org.springframework.web.bind.annotation.RestController;

@RestController
public class CustomerController {

	@Autowired
	private CustomerRepository customerRepository;

	@RequestMapping(path = "/customers/", method = RequestMethod.GET)
	public List<Customer> getCustomers() {
		return customerRepository.findAll();
	}
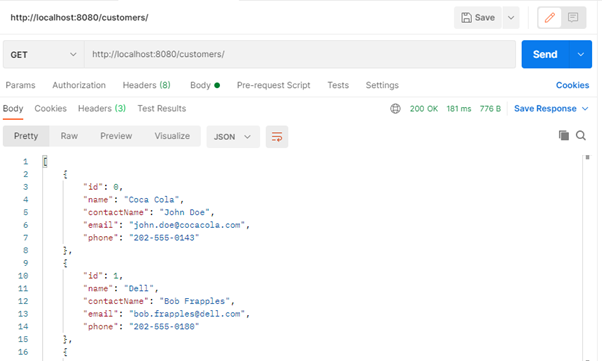
}- If we start our application now, Flyway will identify that this script is unapplied and will execute it. This process happens before Spring Boot gets a chance to bootstrap the application. This is important to guarantee that our database will have the customer table available; otherwise, we would face an error when issuing GET requests to the endpoint created.
- As our application was properly configured, and Flyway got a chance to run the script, we can now issue GET requests to /customers/ without a problem. The following screenshot shows the result of a GET request issued using Postman – which is a great tool to use when developing RESTful endpoints.
Saving Multiple Contacts to Customers
Let us say that the Product Owner of our team has spoken to the users of the application and that they were complaining about not being able to save more than one contact per customer. What can we do to help these users? Well, the first thing we can do is refactor the Customer entity, extracting the contact fields to an entity of its own. This will require us to use JPA to tie both entities, mapping many contacts to one customer, which is accomplished through the @ManyToOne annotation. Lastly, this will require us to create another endpoint to permit the front-end application to retrieve an array of contacts of a specific customer.
The refactoring stated above refers only to the source code of our application. Accomplishing all these changes will not be enough as the database will still contain a single table, customer, with contact details embedded. To fix this issue, we will create another Flyway script, which will contain a command to create the contact table and another command to move customers’ contact details to this new table.
Refactoring the Source Code
Let us begin the refactoring process by addressing the source code of our application. The first thing we will do is to create the Contact class, which will hold contact details of customers.
import jakarta.persistence.Entity;
import jakarta.persistence.GeneratedValue;
import jakarta.persistence.GenerationType;
import jakarta.persistence.Id;
import jakarta.persistence.JoinColumn;
import jakarta.persistence.ManyToOne;

import com.fasterxml.jackson.annotation.JsonIgnore;

@Entity
public class Contact {

	@Id
	@GeneratedValue(strategy = GenerationType.IDENTITY)
	private Long id;

	@JsonIgnore
	@ManyToOne
	@JoinColumn(name = "customer_id")
	private Customer customer;

	private String name;
	private String email;
	private String phone;

	public Contact() {

	}

	public Long getId() {
		return id;
	}

	public void setId(Long id) {
		this.id = id;
	}

	public Customer getCustomer() {
		return customer;
	}

	public void setCustomer(Customer customer) {
		this.customer = customer;
	}

	public String getName() {
		return name;
	}

	public void setName(String name) {
		this.name = name;
	}

	public String getEmail() {
		return email;
	}

	public void setEmail(String email) {
		this.email = email;
	}

	public String getPhone() {
		return phone;
	}

	public void setPhone(String phone) {
		this.phone = phone;
	}

}
After creating the Contact entity, we will now refactor the Customer entity to remove contact properties from it. The Customer class will now look as:
import java.util.List;

import jakarta.persistence.Entity;
import jakarta.persistence.GeneratedValue;
import jakarta.persistence.GenerationType;
import jakarta.persistence.Id;
import jakarta.persistence.OneToMany;

import com.fasterxml.jackson.annotation.JsonIgnore;

@Entity
public class Customer {

	@Id
	@GeneratedValue(strategy = GenerationType.IDENTITY)
	private Long id;

	private String name;

	@JsonIgnore
    @OneToMany (mappedBy = "customer")
    private List<Contact> contacts;

	public Customer() {

	}

	public Long getId() {
		return id;
	}

	public void setId(Long id) {
		this.id = id;
	}

	public String getName() {
		return name;
	}

	public void setName(String name) {
		this.name = name;
	}

	public List<Contact> getContacts() {
		return contacts;
	}

}
Add this method to CustomerController.
@RequestMapping(path = "/customers/{customerId}/contacts/", method = RequestMethod.GET)
	public List<Contact> getCustomerContacts(@PathVariable("customerId") Long customerId) {
		Optional<Customer> customerData = customerRepository.findById(customerId);
		Customer cust = null;

		if (customerData.isPresent()) {
			cust = customerData.get();
			return cust.getContacts();
		} else {
			return null;
		}

	}
As already mentioned, running the application after refactoring the source code and before refactoring the database will generate errors. The database does not have the contact table yet, and the contact details are still residing in the customer table. To address this issue, we will create a second Flyway script. We will call this script V2__contacts.sql and will create it alongside with V1__customers.sql in the src/main/resources/db/migration/ folder.
Updated sql script: V2__contacts.sql
create table contact (
  id serial primary key,
  customer_id int not null,
  name varchar (255) not null,
  email varchar (255) not null,
  phone varchar (255) not null,
  constraint contact_customer_fk
    foreign key (customer_id)
    references customer (id)
);

insert into contact (customer_id, name, email, phone)
  select id, contact_name, email, phone from customer;

alter table customer drop column contact_name;
alter table customer drop column email;
alter table customer drop column phone;
This script has three responsibilities:
- It must create the contact table.
- It must insert the customers’ contact details in this new table.
- It must drop the contact details columns from the customer table.
This is everything we need to do to refactor our database, and it is enough to make it compatible with the refactored source code. Running the application now will make Flyway identify the new script available, V2__contacts.sql, and run it before Spring Boot, making everything work together smoothly.
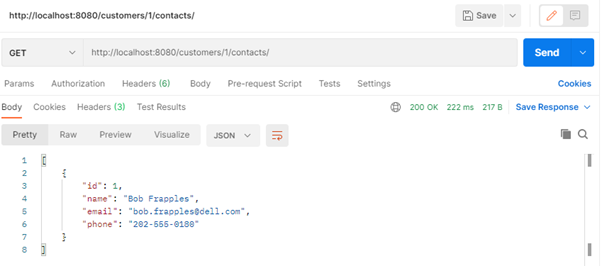
If we issue a GET request to /customers/1/contacts/ now, the endpoint will properly respond with the contact details of Coca-Cola, as shown below.
Conclusion
Having a tool like Flyway integrated into our application is a great addition. With it, we can create scripts that will refactor the database to a state that is compatible with the source code, and we can move data around to guarantee that it will reside in the correct tables.
Flyway will also be helpful if we eventually run into an issue where we need to recover the database from a backup. In a case like that, we can rest assured that Flyway will correctly identify if the combination of the source code version and the database version that we are running have any scripts that need to be applied.