- Java System Properties and Spring Application Configuration
- Configuring Tomcat Server Port
- Actuator Health Check
- Logging
- OpenAPI Specification v3 (OAS3)
- SpringDoc API
- Swagger UI
- JUnit Testing and Spring Boot Test
- REST Client
- Spring Cloud OpenFeign and Netflix Ribbon
What is Java System Properties and Spring Application Configuration?
Java System Properties
Java maintains a set of system properties for its operations. Each java system property is a key-value (String-String) pair. For example, one such system property is “java.version”=”1.7.0_09“.
All system properties can be retrieved via System.getProperties() or to retrieve a single system property System.getProperty(key).
JRE System Properties
| java.home | JRE home directory, e.g., “C:\Program Files\Java\jdk1.7.0_09\jre“ |
| java.library.path | JRE library search path for search native libraries. It is usually but not necessarily taken from the environment variable PATH |
| java.class.path | JRE classpath e.g., ‘.’ (dot – used for current working directory) |
| java.ext.dirs | JRE extension library path(s), e.g, “C:\Program Files\Java\jdk1.7.0_09\jre\lib\ext;C:\Windows\Sun\Java\lib\ext“ |
| java.version | JDK version, e.g., 1.7.0_09 |
| java.runtime.version | JRE version, e.g. 1.7.0_09-b05 |
User Properties
| user.name | the user’s name. |
| user.home | the user’s home directory. |
| user.dir | the user’s current working directory. |
OS Properties
| os.name | the OS’s name, e.g., “Windows 7“. |
| os.version | the OS’s version, e.g., “6.1“. |
| os.arch | the OS’s architecture, e.g., “x86“. |
Getting All System Properties
This is a simple Java program to retrieve all system properties.
- Create a class called PrintSystemProperties.
- Update the class with below codes.
import java.util.Properties;
public class PrintSystemProperties
{
   public static void main(String[] a)
   {
      // List all System properties
      Properties pros = System.getProperties();
      pros.list(System.out);
   }
}
Get a Single System Property
- Update the PrintSystemProperties class with codes to retrieve a single system property by using the key.
// Get a particular System property given its key
// Return the property value or null
System.out.println(System.getProperty("java.home"));
System.out.println(System.getProperty("java.library.path"));
System.out.println(System.getProperty("java.ext.dirs"));
System.out.println(System.getProperty("java.class.path"));
Set System Property
- Set a custom system property using command line.
java -Dcustom_key="custom_value" application_launcher_class- Set system property using Java code.
System.setProperty("custom_key", "custom_value");- Set custom system property in Eclipse.
- a. Run Configurations > Arguments > VM Arguments > -Dcustom_key=”custom_value” > Apply > Run
- Check the output, newly added custom system property should be listed.
Spring Application Configuration
All configuration in Spring originates from the Spring Environment abstraction. The Environment is a dictionary or a map of key-value pairs. We can set and get the application configuration from the Environment abstraction.
Spring Initializr generate an empty application.properties in the src/main/resources/application.properties folder when a new project is created. Spring Boot automatically loads the application.properties whenever it starts up. This is where you can add application property configuration.
- Add a new property in the application.properties file.
message-from-application-properties=Hello from application.properties- Create a new class called ConfigurationApplication in the demo project.
- Update the class with annotations and codes to retrieve the application properties.
- Final codes should look like below.
import org.springframework.boot.ApplicationRunner;
import org.springframework.boot.SpringApplication;
import org.springframework.boot.autoconfigure.SpringBootApplication;
import org.springframework.context.annotation.Bean;
import org.springframework.core.env.Environment;

@SpringBootApplication
public class ConfigurationApplication {

	public static void main(String[] args) {
		SpringApplication.run(ConfigurationApplication.class, args);
	}

	@Bean
	ApplicationRunner applicationRunner(Environment environment) {
		return args -> {
			System.out.println("message from application.properties "
					+ environment.getProperty("message-from-application-properties"));
		};
	}
}- Run this, and you will see the value form the configuration property file in the output of the log.
Configure Tomcat Server Port
There are two ways to configure the embedded Tomcat Server port number.
- Add entry “server.port=8088” in the application.properties file, save and restart.
- Add below codes to your java class
// change apache tomcat port
SpringApplication app = new SpringApplication(ConfigurationApplication.class);
        app.setDefaultProperties(Collections
          .singletonMap("server.port", "8083"));
        app.run(args);
Actuator Health Check with Application Configuration
Spring Boot Actuator module helps you monitor and manage your Spring Boot application by providing production-ready features like health check-up, auditing, metrics gathering, HTTP tracing etc. All these features can be accessed over JMX or HTTP endpoints.
Actuator uses Micrometer, an application metrics facade to integrate with these external application monitoring systems. This makes it super easy to plug-in any application monitoring system with very little configuration.
| Endpoint | Usage |
|---|---|
| /auditevents | Returns all auto-configuration candidates and the reason why they ‘were’ or ‘were not’ applied. |
| /beans | Returns a complete list of all the Spring beans in your application. |
| /mappings | Displays a collated list of all @RequestMapping paths. |
| /env | Returns list of properties in current environment |
| /health | Returns application health information. |
| /caches | It exposes available caches. |
| /conditions | Shows the conditions that were evaluated on configuration and auto-configuration. |
| /configprops | It displays a collated list of all @ConfigurationProperties. |
| /integrationgraph | It shows the Spring Integration graph. Requires a dependency on spring-integration-core. |
| /loggers | The configuration of loggers in the application. |
| /scheduledtasks | Displays the scheduled tasks in the application. |
| /sessions | Returns trace logs (by default the last 100 HTTP requests). Requires an HttpTraceRepository bean. |
| /httptrace | It allows retrieval and deletion of user sessions from a Spring Session-backed session store. Requires a Servlet-based web application using Spring Session. |
| /shutdown | Let us the application be gracefully shutdown. Disabled by default. |
| /threaddump | It performs a thread dump. |
| /metrics | It shows several useful metrics information like JVM memory used, system CPU usage, open files, and much more. |
Reference: https://howtodoinjava.com/spring-boot/actuator-endpoints-example/
- Generate the app from Spring Initializr website.
- Project: Maven
- Spring Boot: default
- Group: com.example
- Artifact: actuator-demo
- Name: actuator-demo
- Description: Demo project for Actuator
- Packaging: Jar
- Java: 17 or 21
- Dependencies: Spring Web, Spring Boot Actuator
- Click Generate. Extract the zip file and import into Eclipse.
Actuator creates several so-called endpoints that can be exposed over HTTP or JMX to let you monitor and interact with your application.
For example, there is a /health endpoint that provides basic information about the application’s health. The /metrics endpoint shows several useful metrics information like JVM memory used, system CPU usage, open files, and much more. The /loggers endpoint shows the application’s logs and lets you change the log level at runtime.
- Add new simple rest controller.
import java.util.Date;
import org.springframework.web.bind.annotation.GetMapping;
import org.springframework.web.bind.annotation.RestController;

@RestController
public class SimpleRestController {
    @GetMapping("/example")
    public String example() {
        return "Hello User !! " + new Date();
    }
}- Run the actuator-demo project.
- The application will start on port 8080 by default. Once the application has started, you can list all the actuator endpoints exposed over HTTP from the URL http://localhost:8080/actuator

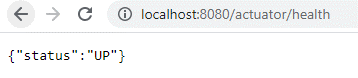
- Try to check the health by accessing http://localhost:8080/actuator/health
- By default, only /health and /info are exposed via Web APIs. Rest are exposed via JMX. Use management.endpoints.web.exposure.include=* to expose all endpoints through the Web APIs.
What is Logging Level?
| Level | Description |
|---|---|
| ALL | All levels including custom levels. |
| DEBUG | Designates fine-grained informational events that are most useful to debug an application. |
| INFO | Designates informational messages that highlight the progress of the application at coarse-grained level. |
| WARN | Designates potentially harmful situations. |
| ERROR | Designates error events that might still allow the application to continue running. |
| FATAL | Designates very severe error events that will presumably lead the application to abort. |
| OFF | The highest possible rank and is intended to turn off logging. |
| TRACE | Designates finer-grained informational events than the DEBUG. |
Logging in your REST service
- Open demo web service project.
- Add log4j dependency to the project, by adding below to pom.xml
<!-- https://mvnrepository.com/artifact/org.apache.logging.log4j/log4j-core -->
<dependency>
    <groupId>org.apache.logging.log4j</groupId>
    <artifactId>log4j-core</artifactId>
    <version>2.23.1</version>
</dependency>- Create a simple test class called TestLog with basic configuration.
import org.apache.logging.log4j.Level;
import org.apache.logging.log4j.LogManager;
import org.apache.logging.log4j.Logger;

public class TestLog {

	private static final Logger logger = LogManager.getLogger(TestLog.class);

	public static void main(String[] args) {
		logger.atLevel(Level.WARN);

		logger.trace("Trace Message!");
		logger.debug("Debug Message!");
		logger.info("Info Message!");
		logger.warn("Warn Message!");
		logger.error("Error Message!");
		logger.fatal("Fatal Message!");

	}

}- Run the program.

Configure Logging Settings with Application Configuration
- In the application.properties file, add these two new entries.
logging.level.com.example.demo=DEBUG
logging.level.root=INFO- This property will set the log level specifically for the com.example.demo package, while the bottom setting will set the root log level.
- Run the demo project.
- Check the output. You should be able to see the DEBUG logs from GreetingController.
What is OpenAPI specification v3 (OAS3)?
Reference: https://github.com/OAI/OpenAPI-Specification
The OpenAPI Specification is a community-driven open specification within the OpenAPI Initiative, a Linux Foundation Collaborative Project.
The OpenAPI Specification (OAS) defines a standard, programming language-agnostic interface description for HTTP APIs, which allows both humans and computers to discover and understand the capabilities of a service without requiring access to source code, additional documentation, or inspection of network traffic. When properly defined via OpenAPI, a consumer can understand and interact with the remote service with a minimal amount of implementation logic. Like what interface descriptions have done for lower-level programming, the OpenAPI Specification removes guesswork in calling a service.
Reference: https://support.smartbear.com/swaggerhub/docs/tutorials/openapi-3-tutorial.html
What is Springdoc OpenAPI?
Reference: https://springdoc.org/
springdoc-openapi java library helps automating the generation of API documentation using spring boot projects. springdoc-openapi works by examining an application at runtime to infer API semantics based on spring configurations, class structure and various annotations.
Automatically generates documentation in JSON/YAML and HTML format APIs. This documentation can be completed by comments using swagger-api annotations.
Adding Springdoc OpenAPI dependency to your Spring REST service
- Add springdoc dependency into pom.xml
<dependency>
      <groupId>org.springdoc</groupId>
      <artifactId>springdoc-openapi-ui</artifactId>
      <version>1.5.9</version>
</dependency>- This will automatically deploy swagger-ui to a spring-boot application.
- Run the demo project.
- Access the documentation at http://localhost:8080/swagger-ui.html
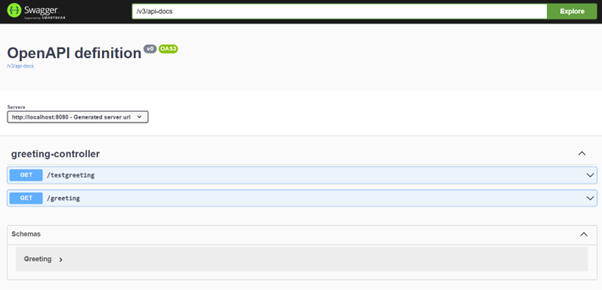
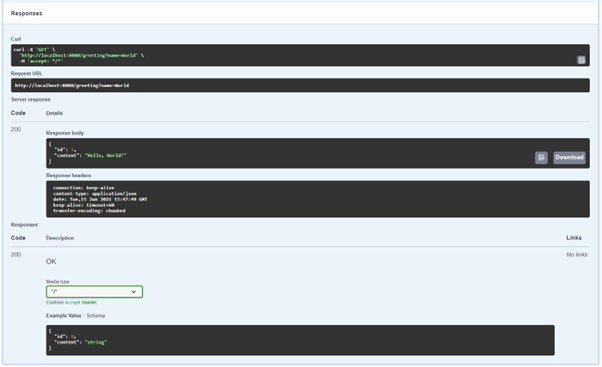
Using Swagger UI to view and test your REST API
- In the Swagger page, click on the drop-down arrow next to /greeting
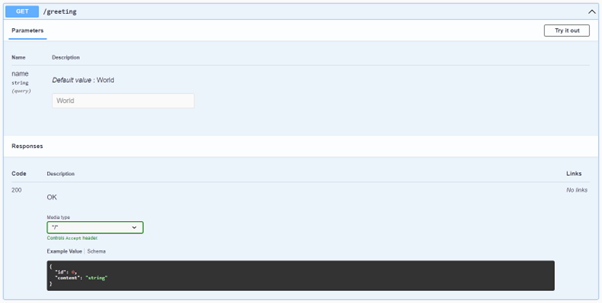
- Click on Try it out button.
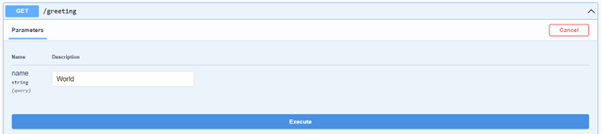
- If necessary, change the name parameter value, then click Execute.
- Review the response displayed.
What is JUnit test and Sprint Boot Test?
Junit Test
Reference: https://junit.org/junit5/
JUnit is a Java test framework and an open-source project hosted at Github. JUnit 5 (also known as Jupiter) is the latest major release of JUnit. It consists of several discrete components:
- JUnit Platform – foundation layer which enables different testing frameworks to be launched on the JVM
- Junit Jupiter – is the JUnit 5 test framework which is launched by the JUnit Platform
- JUnit Vintage – legacy TestEngine which runs older tests
As the usage of JUnit 5 requires multiple libraries to be present, you typically use it with a build system like Maven or Gradle. JUnit 5 needs at least Java 8 to run.
Spring Boot Test
With the @SpringBootTest annotation, Spring Boot provides a convenient way to start up an application context to be used in a test.
Creating JUnit Test for your REST API using WebMvcTest
Reference: https://spring.io/guides/gs/testing-web/
- Create a new project using Spring Initializr or STS.
- Project: Maven
- Language: Java
- Spring Boot: default
- Group: com.example
- Artifact: testing-web
- Name: testing-web
- Description: Demo project for Spring Boot
- Package name: com.example.testing-web
- Packaging: Jar
- Java: 17 or 21
- Dependencies: Spring Web
- Click Generate. Extract the zip file and import into Eclipse.
- Create a new controller called HomeController.
import org.springframework.stereotype.Controller;
import org.springframework.web.bind.annotation.RequestMapping;
import org.springframework.web.bind.annotation.ResponseBody;

@Controller
public class HomeController {

	@RequestMapping("/")
	public @ResponseBody String greeting() {
		return "Hello, World";
	}
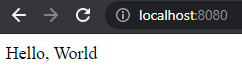
}- Run the application. Test the home page at http://localhost:8080
- Create a simple check test that will fail if the application context cannot start.
import org.junit.jupiter.api.Test;

import org.springframework.boot.test.context.SpringBootTest;

@SpringBootTest
public class TestingWebApplicationTests {

	@Test
	public void contextLoads() {
	}

}
The @SpringBootTest annotation tells Spring Boot to look for a main configuration class (one with @SpringBootApplication, for instance) and use that to start a Spring application context.
- Run the test as Junit Test. Check the output. It should pass the test.

- Create another test class that use assertion.
import static org.assertj.core.api.Assertions.assertThat;

import org.junit.jupiter.api.Test;

import org.springframework.beans.factory.annotation.Autowired;
import org.springframework.boot.test.context.SpringBootTest;

@SpringBootTest
public class SmokeTest {

	@Autowired
	private HomeController controller;

	@Test
	public void contextLoads() throws Exception {
		assertThat(controller).isNotNull();
	}
}
Spring interprets the @Autowired annotation, and the controller is injected before the test methods are run. We use AssertJ (which provides assertThat() and other methods) to express the test assertions.
- Run the test. It should pass the test.

- In the SmokeTest class, change the test method to test for null instead.
assertThat(controller).isNull();- Run the test. It should fail the test.

- Review the error message.
- Undo the last changes to the test method.
Another useful approach is to not start the server at all but to test only the layer below that, where Spring handles the incoming HTTP request and hands it off to your controller. That way, almost of the full stack is used, and your code will be called in the same way as if it were processing a real HTTP request but without the cost of starting the server. To do that, use Spring’s MockMvc and ask for that to be injected for you by using the @AutoConfigureMockMvc annotation on the test case.
- Next is to narrow the tests to only the web layer by using @WebMvcTest.
- Create a new class called WebLayerTest.
import static org.hamcrest.CoreMatchers.containsString;
import static org.springframework.test.web.servlet.request.MockMvcRequestBuilders.get;
import static org.springframework.test.web.servlet.result.MockMvcResultHandlers.print;
import static org.springframework.test.web.servlet.result.MockMvcResultMatchers.content;
import static org.springframework.test.web.servlet.result.MockMvcResultMatchers.status;

import org.junit.jupiter.api.Test;
import org.springframework.beans.factory.annotation.Autowired;
import org.springframework.boot.test.autoconfigure.web.servlet.WebMvcTest;
import org.springframework.test.web.servlet.MockMvc;

@WebMvcTest
public class WebLayerTest {

	@Autowired
	private MockMvc mockMvc;

	@Test
	public void shouldReturnDefaultMessage() throws Exception {
		this.mockMvc.perform(get("/")).andDo(print()).andExpect(status().isOk())
				.andExpect(content().string(containsString("Hello, World")));
	}
}
The test assertion is the same as in the previous case. However, in this test, Spring Boot instantiates only the web layer rather than the whole context. In an application with multiple controllers, you can even ask for only one to be instantiated by using, for example, @WebMvcTest(HomeController.class).
- Run the test and make sure it passes.
What is a REST client?
REST Client is a method or a tool to invoke a REST service API that is exposed for communication by any system or service provider. For example: if an API is exposed to get real time traffic information about a route from Google, the software/tool that invokes the Google traffic API is called the REST client.
What is Spring Cloud OpenFeign and Netflix Ribbon?
Reference: https://cloud.spring.io/spring-cloud-static/spring-cloud-openfeign/2.2.0.RC2/reference/html/
- Feign is a declarative web service client. It makes writing web service clients easier.
- To use Feign create an interface and annotate it. It has pluggable annotation support including Feign annotations and JAX-RS annotations.
- Feign also supports pluggable encoders and decoders.
- Spring Cloud adds support for Spring MVC annotations and for using the same HttpMessageConverters used by default in Spring Web.
- Spring Cloud integrates Ribbon and Eureka, as well as Spring Cloud LoadBalancer to provide a load-balanced http client when using Feign.
Reference: https://www.baeldung.com/spring-cloud-rest-client-with-netflix-ribbon
Netflix Ribbon is an Inter Process Communication (IPC) cloud library. Ribbon primarily provides client-side load balancing algorithms.
Apart from the client-side load balancing algorithms, Ribbon provides also other features:
- Service Discovery Integration – Ribbon load balancers provide service discovery in dynamic environments like a cloud. Integration with Eureka and Netflix service discovery component is included in the ribbon library
- Fault Tolerance – the Ribbon API can dynamically determine whether the servers are up and running in a live environment and can detect those servers that are down
- Configurable load-balancing rules – Ribbon supports RoundRobinRule, AvailabilityFilteringRule, WeightedResponseTimeRule out of the box and also supports defining custom rules
Ribbon API works based on the concept called “Named Client”. While configuring Ribbon in our application configuration file we provide a name for the list of servers included for the load balancing.
Spring Cloud + Netflix Ribbon (2023) Hello World Example
Reference: https://www.codeusingjava.com/cloud/chap1
In this tutorial we will be implementing Spring cloud with Netflix Ribbon with the help of an example.
Microservice architecture offers a great benefit. One advantage is that of scalability. One can scale microservice architecture application in both vertical i.e., by increasing the allocation of heap memory as well as horizontal i.e., by making more than one instances available of same service.
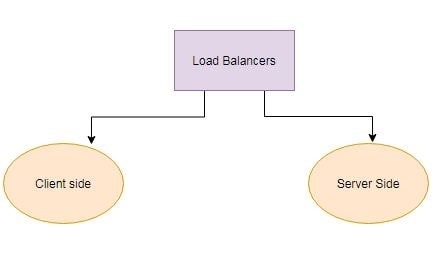
Horizontal scaling is done by the help of Load Balancers.
Load Balancers
There may be situation when there is need to create numerous replicas. This is usually done to manage the traffic by the users. As the name suggest, Load Balancers helps in equal distribution of the traffic.
Types of Load Balancers
Netflix Ribbon is one of the libraries of cloud that helps in providing the client side load balancing.
It uses some criteria and then decide which server to send the request.
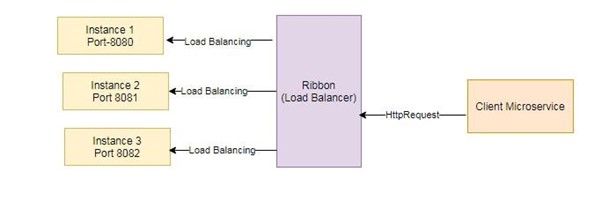
In this example, we will be implementing Netflix Ribbon in a spring boot application. We will be calling instance of demo application multiple times (here 3 times), and then with the help of LoadBalancer Application, the process of Load Balancing will be done, and multiple instances will be managed.
The algorithm uses by Netflix Ribbon for load balancing is Round Robin algorithm.
Sample project can be downloaded from here