- What is JSON, HTTP Methods, REST API and Web Server?
- How does REST API Works
- Microservices Architecture
- Install and Explore Postman
- REST API Standard Naming Conventions
- What is Spring Boot and What is the Advantages of Using Spring Boot
- Create a Maven Project for Spring REST Service
- What is Spring @RestController and @Controller Annotations?
- Inject a Component into Your REST Controller
- Create a github Repository
- Update on github Security
- Commit and Push your Spring REST service project to github Repository
What is JSON, HTTP Methods, REST API and Web Server?
JSON
- JSON stands for JavaScript Object Notation
- JSON is a lightweight format for storing and transporting data
- JSON is often used when data is sent from a server to a web page
- JSON is “self-describing” and easy to understand
{
"employees":[
    {"firstName":"John", "lastName":"Doe"},
    {"firstName":"Anna", "lastName":"Smith"},
    {"firstName":"Peter", "lastName":"Jones"}
]
}
JSON Syntax Rules
- Data is in name/value pairs
- Data is separated by commas
- Curly braces hold objects
- Square brackets hold arrays
HTTP Methods
The Hypertext Transfer Protocol (HTTP) is designed to enable communications between clients and servers.
HTTP works as a request-response protocol between a client and server.

Example
A client (browser) sends an HTTP request to the server; then the server returns a response to the client. The response contains status information about the request and may also contain the requested content.
| HTTP Method | Descriptions |
|---|---|
| GET | Used to request data from a specified resource. |
| POST | Used to send data to a server to create/update a resource. |
| PUT | Used to send data to a server to create/update a resource. |
| DELETE | Almost identical to GET, but without the response body. |
| HEAD | Deletes the specified resource. |
| OPTION | Describes the communication options for the target resource. |
Web Services
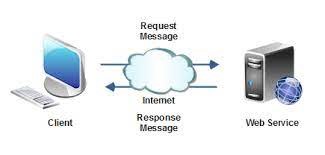
A web service is a collection of open protocols and standards used for exchanging data between applications or systems.
Software applications written in various programming languages and running on various platforms can use web services to exchange data over computer networks like the Internet in a manner like inter-process communication on a single computer.
This interoperability (e.g., between Java and Python, or Windows and Linux applications) is due to the use of open standards.
REST API
An API is an application programming interface. It is a set of rules that allow programs to talk to each other. The developer creates the API on the server and allows the client to talk to it.
REST determines how the API looks like. It stands for “Representational State Transfer”. It is a set of rules that developers follow when they create their API. One of these rules states that you should be able to get a piece of data (called a resource) when you link to a specific URL.
Each URL is called a request while the data sent back to you is called a response.
Web Server
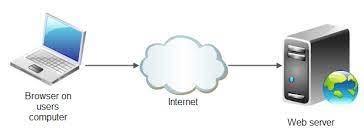
The term web server can refer to hardware or software, or both working together.
- On the hardware side, a web server is a computer that stores web server software and a website’s component files. (For example, HTML documents, images, CSS stylesheets, and JavaScript files) A web server connects to the Internet and supports physical data interchange with other devices connected to the web.
- On the software side, a web server includes several parts that control how web users access hosted files. At a minimum, this is an HTTP server. An HTTP server is software that understands URLs (web addresses) and HTTP (the protocol your browser uses to view webpages). An HTTP server can be accessed through the domain names of the websites it stores, and it delivers the content of these hosted websites to the end user’s device.
How does REST API Works
| Terminology | Descriptions |
|---|---|
| Client | The person or program using the API. The client makes requests to the API to retrieve some information or change something within the application. Your browser is a client – it interacts with APIs for different websites to get page content. The requested info is sent back to your browser and displayed. |
| Server | Used by the application that receives client request i.e., service, and contains resources that the client wants. The server has an API to interact with clients without giving them direct access to content stored in its database. |
| Response | Any piece of information that the API can provide the client. For instance, a resource in Facebook’s API could be a user, a page, a photo, or a post. Each resource has a unique name, called the resource identifier. |
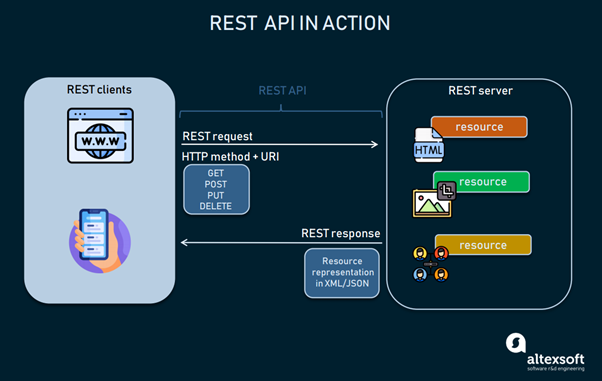
To get access to a resource, the client sends an HTTP request. In return, the server generates an HTTP response with encoded data on the resource.
Both types of REST messages are self-descriptive, meaning they contain information on how to interpret and process them.
REST Request Structure
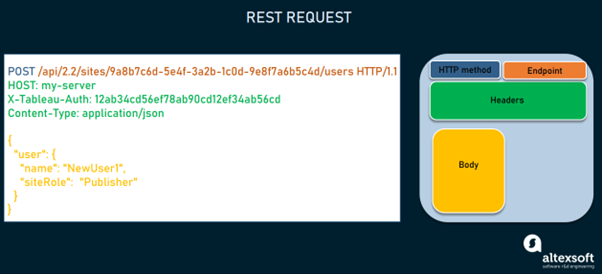
Any REST request includes four essential parts: an HTTP method, an endpoint, headers, and a body.
| Component | Descriptions |
|---|---|
| HTTP Method | Describes what is to be done with a resource. There are four basic methods also name CRUD operations. – POST to create a resource – GET to retrieve a resource – PUT to update a resource – DELETE to delete a resource |
| Endpoint | Contains a Uniform Resource Identifier (URI) indicating where and how to find the resource on the internet. The most common type of URI is a Uniform Resource Locater (URL), serving as a complete web address. |
| Headers | Store information relevant to both the client and server. Mainly, headers provide authentication data – such as an API key, the name or IP address of the computer where the server is installed, and the information about the response format. |
| Body | Used to convey additional information to the server. For instance, it may be a piece of data you want to add or replace. |
REST Response Structure
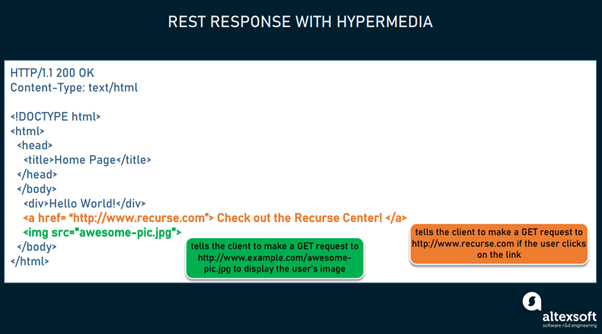
In response, the server sends not the sought-for resource itself, but its representation – a machine-readable description of its current state. The same resource can be represented in different formats, but the most popular ones are XML and JSON.
Microservices Architecture
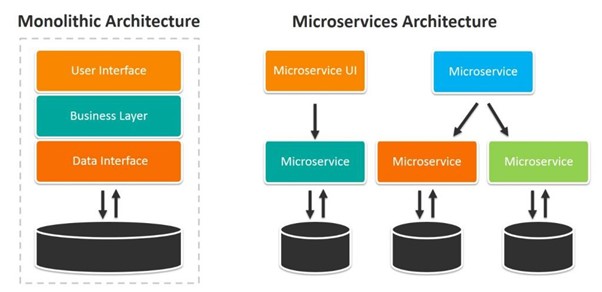
Microservice architecture, aka microservices, are a specific method of designing software systems to structure a single application as a collection of loosely coupled services.
Applications tend to begin as a monolithic architecture (more on that below), and over time grow into a set of interconnected microservices.
The main idea behind microservices is that some types of applications are easier to build and maintain when they are broken down into many small pieces that work together.
Each component of a microservice architecture has:
- Its own CPU
- Its own runtime environment
- Often, a dedicated team working in it, ensuring each service is distinct from one another
This architecture means each service can:
- Run its own unique process
- Communicate autonomously without having to rely on the other microservices or the application as a whole
Example of Microservice Architecture

SoundCloud is a Swedish-founded online audio distribution platform and music sharing website based in Berlin, Germany, that enables its users to upload, promote, and share audio, as well as a DSP enabling listeners to stream audio.
SoundCloud might have a new user microservice designed to onboard a user onto its application. The microservice will activate the user’s account on the backend, and it might be responsible for sending a welcome email to the user, and a walkthrough when the user first logs into the application.
Another microservice for SoundCloud might be to handle uploading and storing a user’s song to the platform. Another might be its search functionality and recommended artists.
A company is divided into departments with people having different responsibilities, like a sales agent, a financier, and a bank teller are all points of contact with the same bank, a company’s microservices divide the responsibility of the whole company into individual actions.
*DSP – data stream processor
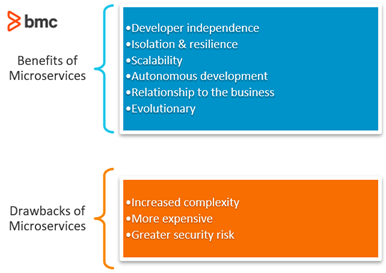
Advantages of Microservices
Applications built as a set of independent, modular components are easier to test, maintain, and understand. They enable organizations to:
- Increase agility
- Improve workflows
- Decrease the amount of time it takes to improve production
Install and Explore Postman
- Download the installer from https://www.postman.com/downloads/
- Run the installer.
- Launch Postman. Login or create account to continue.
Example: Invoking Echo REST API with Postman
Reference: https://www.guru99.com/postman-tutorial.html
Working with GET Requests
- Get requests are used to retrieve information from the given URL. There will be no changes done to the endpoint.
- We will use the following URL for all examples in this Postman tutorial https://jsonplaceholder.typicode.com/users
- Create a new workspace.
- In the workspace:
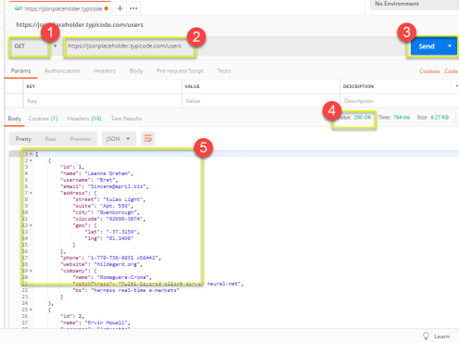
- Set your HTTP request to GET.
- In the request URL field, input link.
- Click send.
- You will see 200 OK Message.
- There should be 10 user results in the body which indicates that your test has run successfully.
Working with POST Requests
- Post requests are different from Get request as there is data manipulation with the user adding data to the endpoint. Using the same data from the previous tutorial in Get request, let us now add our own user.
- Click a new tab to create a new request.
- In the new tab:
- Set your HTTP request to POST.
- Input the same link in request URL https://jsonplaceholder.typicode.com/users
- Switch to Body tab.
- In the Body tab:
- Click Raw.
- Select JSON.
- Copy and paste codes below.
[
    {
        "id": 11,
        "name": "Krishna Rungta",
        "username": "Bret",
        "email": "Sincere@april.biz",
        "address": {
            "street": "Kulas Light",
            "suite": "Apt. 556",
            "city": "Gwenborough",
            "zipcode": "92998-3874",
            "geo": {
                "lat": "-37.3159",
                "lng": "81.1496"
            }
        },
        "phone": "1-770-736-8031 x56442",
        "website": "hildegard.org",
        "company": {
            "name": "Romaguera-Crona",
            "catchPhrase": "Multi-layered client-server neural-net",
            "bs": "harness real-time e-markets"
        }
    }
]- Click Send.
- Status 201 should be displayed.
- Posted data are showing up in the body.
REST API Standard Naming Conventions
- URIs as resources as nouns.
- RESTful URIs should not indicate any kind of CRUD (Create, Read, Update, Delete) functionality. Instead, REST APIs should allow you to manipulate a resource – which should take the form of a noun – through one of the main HTTP methods.
- Example: /users/{id} instead of /getUser
- Pluralized resources.
- Next up is the question of whether resource names should be pluralized. Admittedly, this is a matter of preference; however, most API design experts would suggest you pluralize all resources unless they are singleton resources.
- Example: /users (typical resource) or /users/{id}/address (singleton resource)
- Forward slashes for hierarchy.
- As shown in the examples above, forward slashes are conventionally used to show the hierarchy between individual resources and collections.
- Example: /users/{id}/address clearly falls under the /users/{id} resource which falls under the /users collection.
- Punctuation for lists.
- When there is no hierarchical relationship (such as in lists), punctuation marks such as the semicolon, or, more frequently, the comma should be used.
- Example: /users/{id1},{id2} to access multiple user resources
- Query parameters where necessary.
- To sort or filter a collection, a REST API should allow query parameters to be passed in the URI.
- Example: /users?location=USA to find all users living in the United States
- Lowercase letters and dashes.
- By convention, resource names should use exclusively lowercase letters. Similarly, dashes (-) are conventionally used in place of underscores (_).
- Example: /users/{id}/pending-orders instead of /users/{id}/Pending_Orders
- General Endpoint Naming Best Practices.
- American English
- Intuitive names (no jargon)
- No abridging eg. phone-number instead of tel-no
- No file extensions
- No trailing forward slash
- Consistency is key!
What is Spring Boot and what is the advantage of using Spring?
Reference: https://www.journaldev.com/7969/spring-boot-tutorial
Spring Boot is a completely new project from Pivotal Team (The Spring Team). It is a Framework developed on top of existing Spring Framework.
Spring Boot uses completely new development model to make Java Development very easy by avoiding some tedious development steps and boilerplate code and configuration.
What is Spring Boot?
- Spring Boot is a Framework from “The Spring Team” to ease the bootstrapping and development of new Spring Applications.
- It provides defaults for code and annotation configuration to quick start new Spring projects within no time. It follows “Opinionated Defaults Configuration” Approach to avoid lot of boilerplate code and configuration to improve Development, Unit Test, and Integration Test Process.
What is NOT Spring Boot?
- Spring Boot Framework is not implemented from the scratch by The Spring Team, rather than implemented on top of existing Spring Framework (Spring IO Platform).
- It is not used for solving any new problems. It is used to solve same problems like Spring Framework.
Why Spring Boot?
- To ease the Java-based applications Development, Unit Test, and Integration Test Process.
- To reduce Development, Unit Test, and Integration Test time by providing some defaults.
- To increase Productivity.
Advantages of Spring Boot
- It is very easy to develop Spring Based applications with Java or Groovy.
- It reduces lots of development time and increases productivity.
- It avoids writing lots of boilerplate Code, Annotations and XML Configuration.
- It is very easy to integrate Spring Boot Application with its Spring Ecosystem like Spring JDBC, Spring ORM, Spring Data, Spring Security etc.
- It follows “Opinionated Defaults Configuration” Approach to reduce Developer effort.
- It provides Embedded HTTP servers like Tomcat, Jetty etc. to develop and test our web applications very easily.
- It provides CLI (Command Line Interface) tool to develop and test Spring Boot (Java or Groovy) Applications from command prompt very easily and quickly.
- It provides lots of plugins to develop and test Spring Boot Applications very easily using Build Tools like Maven and Gradle.
- It provides lots of plugins to work with embedded and in-memory Databases very easily.

That means Spring Boot is nothing but existing Spring Framework + Some Embedded HTTP Servers (Tomcat/Jetty etc.) – XML or Annotations Configurations.
Main Goal of Spring Boot
The main goal of Spring Boot Framework is to reduce Development, Unit Test, and Integration Test time and to ease the development of Production ready web applications very easily compared to existing Spring Framework, which really takes more time.
- To avoid XML Configuration completely.
- To avoid defining more Annotation Configuration (It combined some existing Spring Framework Annotations to a simple and single Annotation).
- To avoid writing lots of import statements.
- To provide some defaults to quick start new projects within no time.
- To provide Opinionated Development approach.
Create a Maven Project for Spring REST Service
Reference: https://spring.io/guides/gs/rest-service/
You will build a service that will accept HTTP GET requests at http://localhost:8080/greeting
It will respond with a JSON representation of a greeting, as the following listing shows:

You can customize the greeting with an optional name parameter in the query string, as the following listing shows:

The name parameter value overrides the default value of World and is reflected in the response, as the following listing shows:

Starting with Spring Initializer
- Go to https://start.spring.io/
- Configure the new project.
- Project: Maven
- Language: Java
- Sprint Boot: default selection
- Project Metadata: default settings
- Packaging: Jar
- Java: 17 or 21
- Dependencies: Spring Web
- Click Generate button.
- Extract the downloaded zip file.
- Import Maven project into Eclipse.
Create a Resource Representation Class
Now that you have set up the project and build system, you can create your web service.
Begin the process by thinking about service interactions.
The service will handle GET requests for /greeting, optionally with a name parameter in the query string. The GET request should return a 200 OK response with JSON in the body that represents a greeting. It should resemble the following output:
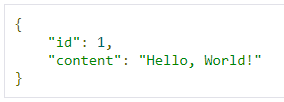
The id field is a unique identifier for the greeting, and content is the textual representation of the greeting.
To model the greeting representation, create a resource representation class. To do so, provide a plain old Java object with fields, constructors, and accessors for the id and content data, as below.
public class Greeting {
  private final long id;
  private final String content;

  public Greeting(long id, String content) {
    this.id = id;
    this.content = content;
  }

  public long getId() {
    return id;
  }

  public String getContent() {
    return content;
  }
}
Create a Resource Controller
In Spring’s approach to building RESTful web services, HTTP requests are handled by a controller.
These components are identified by the @RestController annotation, and the GreetingController shown in the following listing, handles GET requests for /greeting by returning a new instance of the Greeting class.
import java.util.concurrent.atomic.AtomicLong;
import org.springframework.web.bind.annotation.GetMapping;
import org.springframework.web.bind.annotation.RequestParam;
import org.springframework.web.bind.annotation.RestController;

@RestController
public class GreetingController {

	private static final String template = "Hello, %s!";
	private final AtomicLong counter = new AtomicLong();

	@GetMapping("/greeting")
	public Greeting greeting(@RequestParam(value = "name", defaultValue = "World") String name) {
		return new Greeting(counter.incrementAndGet(), String.format(template, name));
	}
}
This controller is concise and simple, but there is plenty going on under the hood. We break it down step by step.
The @GetMapping annotation ensures that HTTP GET requests to /greeting are mapped to the greeting() method.
@RequestParam binds the value of the query string parameter name into the name parameter of the greeting() method. If the name parameter is absent in the request, the defaultValue of World is used.
The implementation of the method body creates and returns a new Greeting object with id and content attributes based on the next value from the counter and formats the given name by using the greeting template.
This code uses Spring @RestController annotation, which marks the class as a controller where every method returns a domain object instead of a view. It is shorthand for including both @Controller and @ResponseBody.
Run the Application
You can run the project in eclipse and select Run As > Java Application.
When prompted, make sure to select the correct class that contains the main method eg. DemoApplication
Test the Service
Now that the service is up, visit http://localhost:8080/greeting, where you should see:

Provide a name query string parameter by visiting http://localhost:8080/greeting?name=User. Notice how the value of the content attribute changes from Hello, World! to Hello, User!, as the following listing shows:

This change demonstrates that the @RequestParam arrangement in GreetingController is working as expected. The name parameter has been given a default value of World but can be explicitly overridden through the query string.
Notice also how the id attribute has changed from 1 to 2. This proves that you are working against the same GreetingController instance across multiple requests and that its counter field is being incremented on each call as expected.
Run and Test your REST service with Postman
- Launch Postman. You might need to login if necessary.
- Select your workspace.
- Make sure GET method is selected then enter the URL http://localhost:8080/greeting

- Click Send.
- You will get 200 OK message with the Body content as below.

Try on Your Own
Try sending another GET request but this time send a parameter name.
What is Spring @RestController and @Controller Annotations?
- @RestController is a convenience annotation for creating Restful controllers.
- It is a specialization of @Component and is autodetected through classpath scanning.
- It adds the @Controller and @ResponseBody annotations. It converts the response to JSON or XML.
- It does not work with the view technology, so the methods cannot return ModelAndView.
- It is typically used in combination with annotated handler methods based on the @RequestMapping annotation.
- The @Controller annotation is used with the view technology.
What is a Spring @Component Annotation?
@Component is an annotation that allows Spring to automatically detect our custom beans.
In other words, without having to write any explicit code, Spring will:
- Scan our application for classes annotated with @Component
- Instantiate them and inject any specified dependencies into them
- Inject them wherever needed
Inject a Component into Your REST Controller
In this example, we are going to create a new Java class called GreetingComponent, annotated with @Component and then injected it into GreetingController.
- Add a new Java class called GreetingComponent into package com.example.restservice
- Annotate GreetingComponent class with @Component
- Add a method to return a string message.
- The completed code should look like below:
import org.springframework.stereotype.Component;

@Component
public class GreetingComponent {

	public String getMessage() {
		return "Hello from GreetingComponent";
	}
}- In the GreetingController class,
- Add a private variable to store the GreetingComponent object.
- Add a constructor to initialize the GreetingComponent object. Annotate the constructor with @Autowired
- Add a method to call a method on GreetingComponent object and return the string message.
- The completed code for GreetingController should look like below.
import java.util.concurrent.atomic.AtomicLong;
import org.springframework.beans.factory.annotation.Autowired;
import org.springframework.http.ResponseEntity;
import org.springframework.web.bind.annotation.GetMapping;
import org.springframework.web.bind.annotation.RequestParam;
import org.springframework.web.bind.annotation.RestController;

@RestController
public class GreetingController {

	private static final String template = "Hello, %s!";
	private final AtomicLong counter = new AtomicLong();

	// define a GreetingComponent variable without initialization
	private GreetingComponent g;

	// inject/initialize GreetingComponent in the constructor
	@Autowired
	public GreetingController(GreetingComponent g) {
		this.g = g;
	}

	@GetMapping("/greeting")
	public Greeting greeting(@RequestParam(value = "name", defaultValue = "World") String name) {
		return new Greeting(counter.incrementAndGet(), String.format(template, name));
	}

	// test the greeting component
	@GetMapping("/testgreeting")
	public ResponseEntity<String> getMessage() {
		return ResponseEntity.ok(g.getMessage());
	}
}- Run the application by right-click > Run As > Java Application.
- Test the service.
- a. In the browser, type http://localhost:8080/testgreeting
- b. The output should look like below

Create a GitHub repository
- Login to https://github.com/
- If you do not have an account, create a new one.
- Create a new repository called rest-service
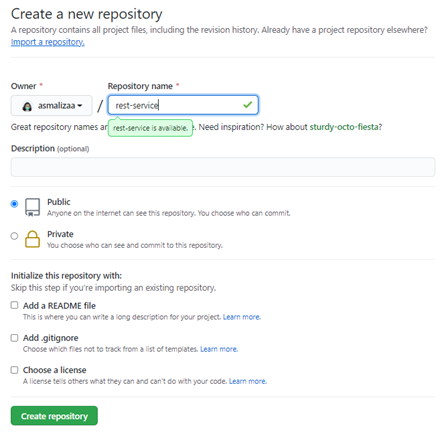
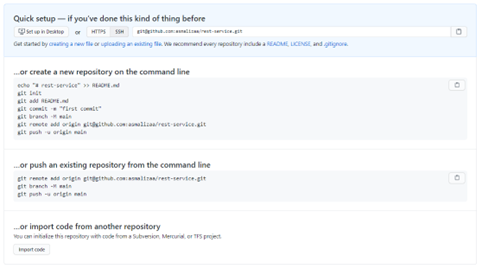
- Once successfully created, you will a page like below.
Update on github Security
References:
- https://github.blog/changelog/2021-08-12-git-password-authentication-is-shutting-down/
- https://stackoverflow.com/questions/68790276/pushing-from-eclipse-to-my-github-repository-via-https-stopped-working-git-rec/68802292#68802292
Personal access token
- Go to your GitHub account to Settings > Developer settings > Personal access tokens website:
- Click the Generate new token button in the upper right
- Enter a Note, e.g., GitHub repo token
- Choose Expiration, e.g. No expiration
- Tick the checkbox repo
- Click the Generate token button at the bottom.
- Copy the generated token to the clipboard.
- In Eclipse, in the Git Repositories view:
- Right-click the Remotes sub-node for GitHub (origin or the name you have chosen when you have cloned the repository) and choose Configure Push…
- Click the Change… button to change the URI in the upper right
- Replace the password with the copied generated GitHub token
- Click Finish and Save to apply the changes
Commit and push your Spring REST service project to Git repository
- First, we need to clone/add the newly created repository into Eclipse.
- Open the Git perspective.
- On the Git Repositories tab, click on Clone a Git Repository and add the clone to this view.
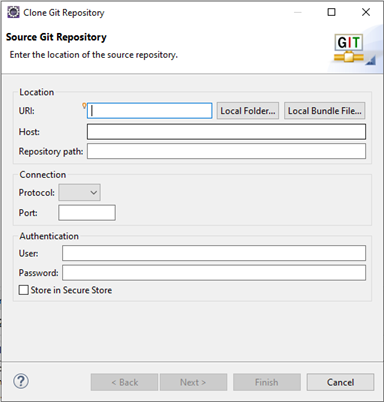
- Enter the URI to your repository, username, and password (you can choose to leave it empty now as it will prompt you to login later).
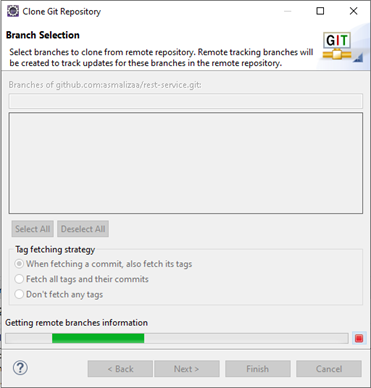
- Click Next > and then wait for it to complete. Then click Next > again.
- In the Local Repository step, accept all settings then click Finish.
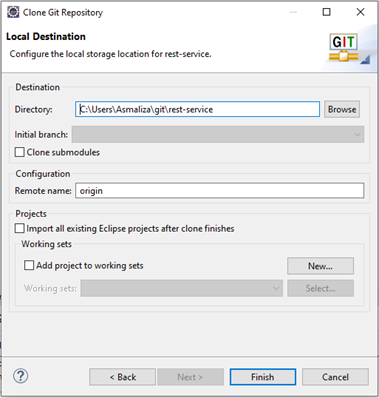
- At this point you will see the rest-service repository is added to the Git Repositories tab.

- Now, switch back to Java EE perspective.
- To add rest-service project to the repository
- Right-click project > Team > Share Project
- Select the repository from the drop-down list, then click Finish.
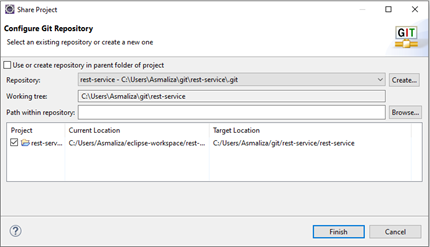
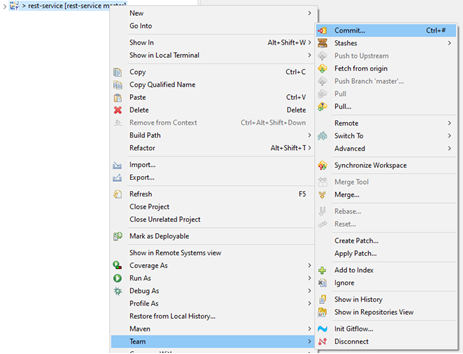
- To commit/push project to GitHub repository
Right-click project > Team > Commit
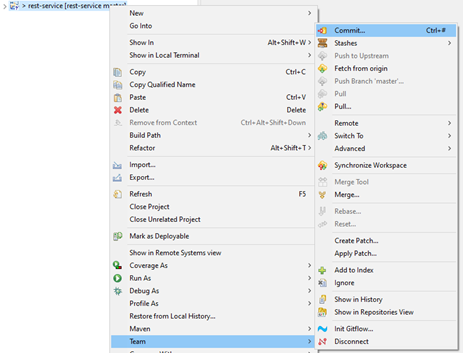
- In the Git Staging tab
Select everything under Unstaged Changes and drag it into Staged Changes.

Enter a Commit Message: First Commit
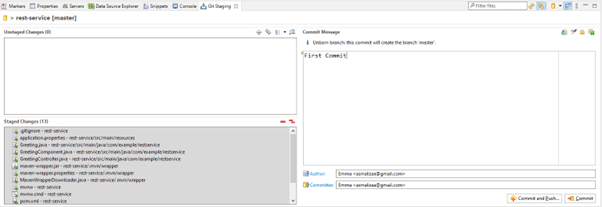
Click Commit and Push.
In the Push to branch in remote step, accept all settings then click Preview >
You will be prompted to login.
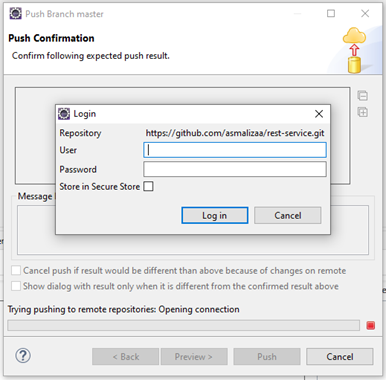
In the Push confirmation, accept all settings and click Push.
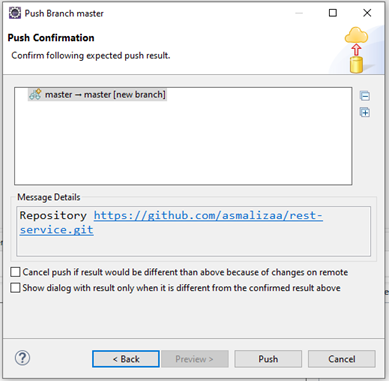
Wait until Push completed.
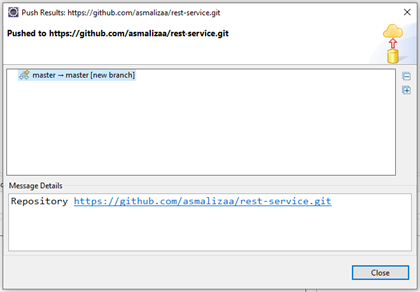
Go back to GitHub in your browser, refresh the page, you will see your project is now added to the repository.