Reference: https://maven.apache.org/
Apache Maven is a software project management and comprehension tool. Based on the concept of a project object model (POM), Maven can manage a project’s build, reporting and documentation from a central piece of information.
Maven, a Yiddish word meaning accumulator of knowledge, began as an attempt to simplify the build processes in the Jakarta Turbine project. There were several projects, each with their own Ant build files, that were all slightly different. JARs were checked into CVS. We wanted a standard way to build the projects, a clear definition of what the project consisted of an easy way to publish project information, and a way to share JARs across several projects.
The result is a tool that can now be used for building and managing any Java-based project. We hope that we have created something that will make the day-to-day work of Java developers easier and generally help with the comprehension of any Java-based project.
Maven Objectives
Maven’s primary goal is to allow a developer to comprehend the complete state of a development effort in the shortest period. To attain this goal, Maven deals with several areas of concern:
- Making the build process easy
- While using Maven does not eliminate the need to know about the underlying mechanisms, Maven does shield developers from many details.
- Providing a uniform build system
- Maven builds a project using its project object model (POM) and a set of plugins. Once you familiarize yourself with one Maven project, you know how all Maven projects build. This saves time when navigating many projects.
- Providing quality project information
- Maven provides useful project information that is in part taken from your POM and in part generated from your project’s sources. For example, Maven can provide:
- Change log created directly from source control
- Cross referenced sources
- Mailing lists managed by the project
- Dependencies used by the project
- Unit test reports including coverage
- Third party code analysis products also provide Maven plugins that add their reports to the standard information given by Maven.
- Maven provides useful project information that is in part taken from your POM and in part generated from your project’s sources. For example, Maven can provide:
- Encouraging better development practices
- Maven aims to gather current principles for best practices development and make it easy to guide a project in that direction.
- For example, specification, execution, and reporting of unit tests are part of the normal build cycle using Maven. Current unit testing best practices were used as guidelines:
- Keeping test source code in a separate, but parallel source tree
- Using test case naming conventions to locate and execute tests
- Having test cases setup their environment instead of customizing the build for test preparation
Maven also assists in project workflow such as release and issue management.
Maven also suggests some guidelines on how to layout your project’s directory structure. Once you learn the layout, you can easily navigate other projects that use Maven.
While takes an opinionated approach to project layout, some projects may not fit with this structure for historical reasons. While Maven is designed to be flexible to the needs of different projects, it cannot cater to every situation without compromising its objectives.
If your project has an unusual build structure that cannot be reorganized, you may have to forgo some features or the use of Maven altogether.
What Maven is Not
You might have heard some of the following things about Maven:
- Maven is a site and documentation tool
- Maven extends Ant to let you download dependencies
- Maven is a set of reusable Ant scriptlets
While Maven does these things, as you can read above in the “What is Maven?” section, these are not the only features Maven has, and its objectives are quite different.
Create a simple Maven project
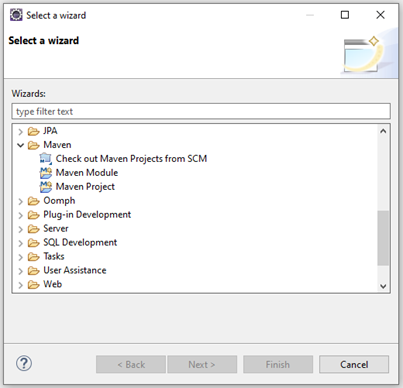
- To create a new Maven project in Eclipse go to File > New > Other > Maven > Maven Project
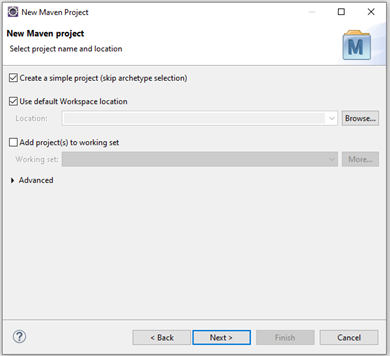
- In the New Maven project page, make sure to select “Create a simple project” and “Use default workspace location” and then click Next >
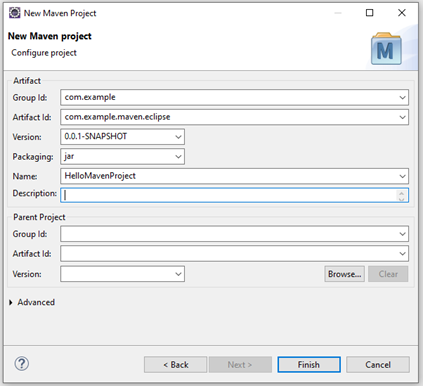
- In the Configure project page, enter the configuration as below, then click “Finish”.
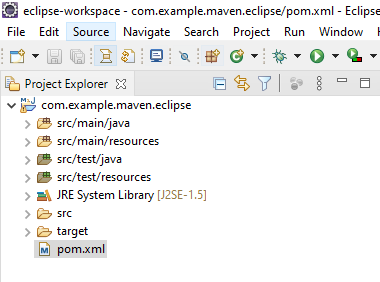
- New project will be created and opened in the workspace.
Guide to naming conventions on groupId, artifactId, and version
| groupId | Uniquely identifies your project across all projects. A group ID should follow Java’s package name rules. This means it starts with a reversed domain name you control. For example, org.apache.maven, org.apache.commons You can create as many subgroups as you want. A good way to determine the granularity of the groupId is to use the project structure. That is, if the current project is a multiple module project, it should append a new identifier to the parent’s groupId. For example, org.apache.maven, org.apache.maven.plugins, org.apache.maven.reporting |
| artifactId | The name of the jar without version. If you created it, then you can choose whatever name you want with lowercase letters and no strange symbols. If it is a third-party jar, you must take the name of the jar as it’s distributed. For example, maven, commons-math |
| version | If you distribute it, then you can choose any typical version with numbers and dots (1.0, 1.1, 1.0.1, …). Do not use dates as they are usually associated with SNAPSHOT (nightly) builds. If it is a third-party artifact, you have to use their version number whatever it is, and as strange as it can look. For example, 2.0, 2.0.1, 1.3.1 |
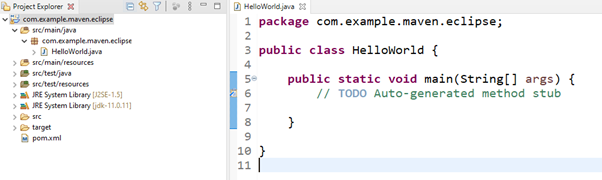
Create a Java main entry class
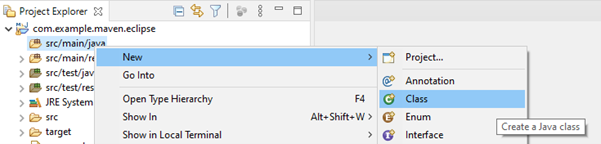
- To add a new Java class with main method, right-click src/main/java folder > New > Class
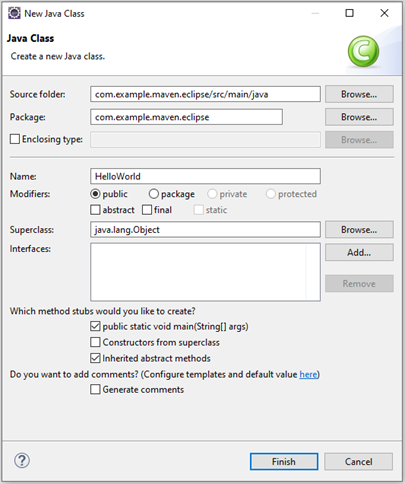
- Set the name of the new class to HelloWorld, make sure to select “public static void main (String[] args)” option, and then click Finish.
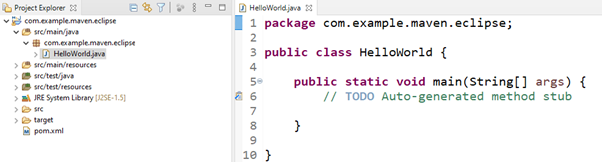
- A new class called HelloWorld will be added to the project.
Setting java version in Maven project
- Right-click project name > Properties > Java Build Path > Libraries > Add Library.
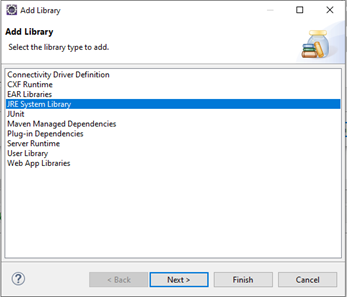
- In the Add Library screen, select JRE System Library, then click Next >
- In the JRE System Library screen, make sure “Workspace default JRE” is selected and then click Finish.
Alternatively, you might want to specify the location/alternate JRE that you want to use for your project here.
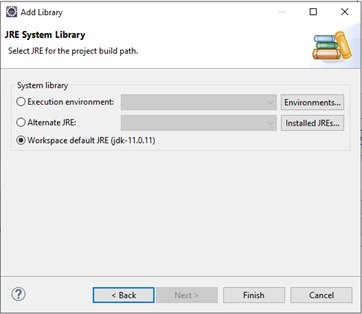
- Click “Apply and Close”.
Introduction to Java standard project structure
- src/main/java
- Inside this folder you can put all the application source files. Classes and packages for the main (real) artifact should be put in this folder.
- All the content inside of this directory will be put in the classpath of the generated artifact. If the artifact is a jar file, all the classes and packages will be in the root folder of the generated jar, so it will be available by default on the runtime classpath.
- If the artifact is a war, all the classes and packages will be put inside the WEB-INF/classes directory, so it will be available on the runtime classpath by default.
- When the project is built or packaged all those classes and packages will be put in the target folder.
- If you use eclipse as your IDE, this directory will be put inside the java build path automatically when you give the maven nature to the project.
- src/test/java
- Inside this folder you can put all the application test source files. Classes and packages for the test artifact should be put in this folder.
- All the content inside of this directory will NOT be put in the classpath of the generated artifact.
- When the project is built or packaged all those classes and packages will be put in the target folder.
- When you run your test, you must be aware that maven surefire plugin will run the classes from the target directory.
- If you use eclipse as your IDE, this directory will be put inside the java build path automatically when you give the maven nature to the project.
- src/main/resources
- Inside this folder you can put all the application resource files. Resources for the main (real) artifact should be put in this folder.
- All the content inside of this directory will be put in the classpath of the generated artifact. If the artifact is a jar file, all the resources will be in the root folder of the generated jar, so it will be available by default on the runtime classpath.
- If the artifact is a war, all resources will be put inside the WEB-INF/classes directory, so it will be available on the runtime classpath by default.
- When the project is built or packaged all those resources will be put in the target folder.
- If you use eclipse as your IDE, this directory will be put inside the java build path automatically when you give the maven nature to the project.
- src/test/resources
- Inside this folder you can put all the application test resource files. Resources for the test artifact should be put in this folder.
- All the content inside of this directory will NOT be put in the classpath of the generated artifact.
- When the project is built or packaged all those test resources will be put in the target folder.
- When you run your test, you must be aware that maven surefire plugin will use resources from the target directory.
- If you use eclipse as your IDE, this directory will be put inside the java build path automatically when you give the maven nature to the project.
- pom.xml
- The pom (Project Object Model) file is a maven special file that describe how the project must be build and from when maven should download artifacts/dependencies, what are those dependencies and so many more things. This file is placed on the root project folder.

Using Eclipse Content Assist and Quick Fix
To configure Content Assist, go “Preferences>Java>Editor>Content Assist>Advanced “.
Whenever it detects an error, the Java editor highlights the error using a wavy red line under the offending code and a marker in the left editor margin. Moving the mouse over the underlined code or the marker will indicate the error. The marker can be selected with the left mouse to activate the Quick Fix pop-up, indicating actions that can be undertaken to repair the error. Alternatively, pressing Ctrl+1 will activate Quick Fix from the keyboard.
A full list of available Quick Fixes is given at Help > Help Contents > Java Development User Guide > Concepts > Quick Fix. Updating quick fixes as you type can be computationally intensive, so you can turn this off via Window > Preferences > Java > Editor > Annotations > Analyze annotations while typing.